
I hope it never happens but here’s some guidance, if i does.
Using Gemini on the iPhone
How to use Google’s Gemini (Bard replacement) app on an iPhone.
The drawbacks (possibly/allegedly) of entering the Apple ecosystem
I’m only posting this to indicate just how open and fair I am (HaHa) …
https://www.howtogeek.com/before-you-commit-to-the-apple-ecosystem
The Rule of Six:- Smart watches.

Remember the digital chip that was inserted into the Covid 19 vaccine….the one that would kick into action at some unspecified date and force you to do things that you might not have considered before? Mine forces me to buy tech products. That digital chip even knows my P.I.N. number. An Apple Watch was one of my most recent purchases but I might say that I’m absolutely delighted with the device. It looks after me; a bit like having Jiminy Cricket on my shoulder. It does things for me that are really useful, potentially even vital.

- It has a feature called Fall Detection. Those who know me will know that I’ve had a few falls over the last few years. I’ve sustained quite a few injuries including three broken ribs once. Believe me, falling over is no fun. Luckily, every time it has happened there have been kind Samaritans around, but what if I took a tumble whilst on a park walk, where there was nobody around? That is where Fall Detection comes in. The watch will know when you’ve fallen over. On the screen it will show a message, “You’ve fallen over. Are you O.K.?” You then have one minute to respond to that message. If you don’t respond within one minute, it will send for an ambulance, sending it to the GPS location provided by your watch. Here are a couple of videos. https://youtu.be/yZgzAhBa7Kc?si=2eTcmhPMFsJgIpKi. And https://youtu.be/OWasOBv15qk?si=zjaMW5gnKDcX8j2H
- Medical I.D. You can tell your phone and your watch your ailment and prescription details. Now, I know we should be wary of giving computers too much sensitive information but as far as I know, this information can be gained from my watch by medical professionals in times of trouble only.
- Health monitoring. The watch can give you all sorts of information about your health. This includes a step counter, sleep monitor, it can even monitor your walking steadiness. It is even said that it can detect atrial fibrillation although you might want to check that out yourself. The more expensive models have blood oxygen and ECG apps included. I went for the cheapest model, the SE second generation. (£219 at the moment). I think that is sufficient for my personal level of hypochondria.
- A torch. Nifty ! There are a couple of ways to get the screen to light up, giving you roughly the illumination level of a candle. Sufficient to help you find the toilet during night time excursions in unfamiliar hotel rooms. Use Siri (yes, the watch has Siri) and simply say ’Torch on’, or for Harry Potter fans, say ‘Lumos”. To switch off, simply place your hand over the watch face.
- Answer the phone. If your phone is in another room and rings, you can accept the call from your watch, speaking and listening to your watch. You can also send text messages to your watch using Siri.
- Alarm clock / timer. Simply ask Siri to set an alarm. It wakes you with vibrations on your wrist. This is actually a really pleasant way to be woken up.
Things to be aware of.
The Apple Watch works in conjunction with your iPhone. It won’t do much on its own.
I haven’t looked in to this, but I’m pretty sure that there are alternatives in the Android world that will do pretty much the same thing.
There are other, far cheaper brands of Smart Watch available. I tried a £40 model but I had to stop using it because it made my wrist itch.
Oh, and just one more thing, especially for the gentlemen in the group.
From How An Older Man Should Dress | Older Man’s Clothing Tips 2024
Older Man Clothing Tip #4: Own the Latest Technology
Autumn cleaning – maintenance


First, an overview
This article from Norton is as good as any at summarising what you should do by way of maintenance – regular tasks that will make your machine run smoother, and possibly faster.
Backups
There are built-in options supplied for both Windows and MacOS – there’s no real reason to look beyond these. This table (for Windows 10) shows the different methods you might consider. I’ve also included this article that might help you understand what your need to do. However, with Windows (it’s never straightforward) you have another option File History, which maybe a better option, as it focuses on saving files to an external hard disk.
For the Mac, I wouldn’t bother going further than TimeMachine. You’ve heard me rave on about the Mac, but it’s true. You may do things differently on a Mac, but they’re just easier.
The most important thing is to do Backups, and do them regularly. My TimeMachine does an incremental backup every hour to an external hard disk. So the most I can lose should the machine crash, is the last 59 minutes. Some items will be excluded from this backup (eg photos) as they are backed-up automatically to iCloud when I import them on to my machine.
Windows 10 and 11 Maintenance
Let’s start by looking at this short video. You’ll want to go back and watch it more than once. Although it is aimed at Windows 10, I think all the utilities mentioned are available from Windows 11 too.
If you prefer reading to watching, and you’re a Windows 11 user, you will possibly find this article useful. If you don’t trust yourself to do the maintenance regularly, then Windows 10 users might find this article useful as it tells you how to schedule automatic maintenance and what it will do, but if you prefer your instruction to be visual you could watch this video instead, or as well.
If it’s just a speed-up you want from your Windows 11 system, you could work your way through the list in this article, but I’d be tempted to do the more comprehensive list of tasks mentioned in the videos above.
MacOs Housekeeping
Here it’s more housekeeping than maintenance, there are some things you can do to improve performance on your Mac, regular maintenance (as mentioned above) is not really required. This article aims to make your machine run better and faster – I’ll have to read it!!
The software I use on my Mac is CleanMyMac X – this article describes what you should do to automatically do some decluttering, which is probably a good thing and which I run once in a while; it obviously recommends that you use CleanMyMac to do it. Quelle surprise!
Operating system updates and upgrades
These are usually well announced by Microsoft and Apple. Generally, if the update is described as a Security Update, you should do it immediately; if it’s described as a bug-fix, or a point release with new features, I would counsel waiting a while … perhaps a couple of weeks, before installing it. Of course you can leave your operating system to do these automatically, so check your settings (as described in the videos) and select the time that your updates will be done.
More substantial upgrades are less frequent and my advice is to wait a while before installing these as it’s always challenging to go back to a previous release, and sometimes the upgrade will affect the running of one of your applications. All serious software developers will apply to get advance access to operating system upgrades to test their software on the new platform; but even with this access some bugs may not appear until the operating system is “out-in-the-wild”.
Internet history, cache and cookie cleaning
These were covered in the earlier videos but you should probably do these quite regularly anyway. You might have noticed that cookies weren’t “cleaned-out”. That’s probably because the majority of them will be re-installed the next time you go to a website, and cleaning them will also mean you have to re-enter information again. Generally, with good anti-virus software these days, cookie cleaning is not essential, as the malware threat has been reduced before they’re added to the browser.
Anti-virus and malware checking
For the Mac I have MalwareBytes (supplied by my bank). For the PC/Windows you know that I recommend Widows Defender, as it’s more than adequate for the “ordinary” user who’s not surfing the dark web! It’s evident that Microsoft have upped their game in this area and you can also deploy other tools to protect your machine. Take a look!

Hardware upgrades – memory, batteries
You might wonder whether you’re up to upgrading memory or batteries on your laptop or desktop, but actually this is a relatively easy job. You can use components from Crucial for memory and hard disk upgrades, and they describe how to do it for specific machines, or you can search for compatible components on the internet. Search for the instructions on how to fit for the specific DIY task. You’ll feel a sense of pride when you’ve completed the task too! A triumph for “person kind” over the machine
A really good upgrade is to replace an old Hard Disk Drive (HDD) with a Solid State Drive (SSD). The performance enhancement you will experience will be noticeable. You can always deploy the old HDD as an external disk and maybe use it for your backups when you place it in an appropriate caddy.
If you’ve not got the courage to do it yourself, you can always ask We will fix your PC to do it for you.

Cleaning screens and keyboards
Often overlooked, your screen and keyboard can always do with a clean, and you’ll be surprised at the difference it makes – to your mood if nothing else. I recently purchased this kit from Amazon to clean screens, keyboards and TV.
Application housekeeping
Another often overlooked consideration. You should look at whether your software should be upgraded. If it was purchased through an AppStore then you should be able to find out if there’s an upgrade available – you may have to purchase it, but often the upgrade will be free. Often the software provider – if you’ve registered your ownership – will inform/advise you of an upgrade to a new version, or release. Generally bug-fixes are not chargeable, but you may have to pay for feature-enhancements.
Please be aware that it’s impossible to expect that a software developer will keep their software compatible with every release of operating system software, so if advised that this is the case you should seriously consider an Upgrade, or finding a replacement if the software passes “out-of-support”.
You should also look to see whether (as was mentioned in the videos) you actually need the software anymore. At best it might just be taking up disk space you might need, at worst (as it becomes more outdated) it might provide a “backdoor” for malware to enter your system and upset your life!
Some applications (as was mentioned in the videos) also have local data caches and backups (genealogy database software is notorious for this). As you exit your session you are prompted to save a backup – the question is … how many backups do you actually need!!
All-in-one solutions
For the PC/Windows you could look at CCleaner (free version) – I love this quote from the article “Macs don’t need standard cleaning” but I do have MacPaw’s CleanMyMac X on my machine, and I bought it! However if you’re a Windows user there’s a lot to be said to doing the cleanup manually following the suggestions mentioned in the videos, I have shown.
Miscellaneous – eMail, Contacts, Calendars, Reminders, Notes, Photos
Not strictly maintenance but something to bear in mind and perhaps make a regular task, is maintaining your “everyday” applications.
Do you need to keep all your eMails? It may be possible to Archive them outside the Mail application – thus making it run faster and more efficiently. You can also if you’re using a local mail client (recommended) occasionally rebuild, or optimise, the email storage. It’s just a database and it will run more efficiently if it doesn’t have a lot of redundant links to deleted messages, and the like, contained in it. You may be surprised at the large number of files (especially photos) that are stored in your email. Perhaps you should save them to a Photos app, or at least download them to a folder on your machine – they’d be more accessible there.
It’s surprising how many Contacts are duplicated, or how details and lists can get out-of-date. Always a good idea to review them and merge duplicates, edit changes and delete no longer needed entries.
Calendars are less needing of maintenance. If the day has passed, so what; it’s more important to know the forthcoming events are accurate and up-to-date. However recurring entries should be reviewed occasionally.
Again, like the above, it’s more important to keep Reminders up-to-date, and if you decide to use that utility, to stick to it. It’s an application that you shouldn’t use occasionally, you should commit to using it, and then be able to rely on it. As I demonstrated recently you can talk to it – as of course you can with a lot of utilities and applications.
Notes can become a bit of a dustbin, and I suppose you should be allowed to have somewhere you just dump stuff. However, they do have a very useful role in planning, and charting progress of a project, or a trip – especially when you can show completion with a bullet-point format. The functionality is always improving and now you can store website addresses, photos, maps, music and more in a note and then share it with someone else so that they can collaborate with you on the topic. It’s just a bit embarrassing when you look back at what you’ve “noted” and realise it never actually “turned-out-like-that”.
Finally Photos. Probably the biggest hard disk grabber of all. You need to plan a strategy for what you want to keep, the application you want to use to access them, or share them, and then – if at all possible – stick to your plan! Not always easy, but for your sanity, probably essential. The first task is to work out your duplicates. This is where DupeGuru comes in. Apiece of open source software that has proven to be a life-saver to me, and a tool that has allowed me to recover a lot of disk space. It works well with phoitos, but can also be used to find duplicates of other file types as well.
… and there’s probably more – over to you!!!
More reading
PC Maintenance Software: 6 Best to Use in 2023
Best free PC optimizer of 2023
Creating shortcuts – to Thoughtgrazing in particular
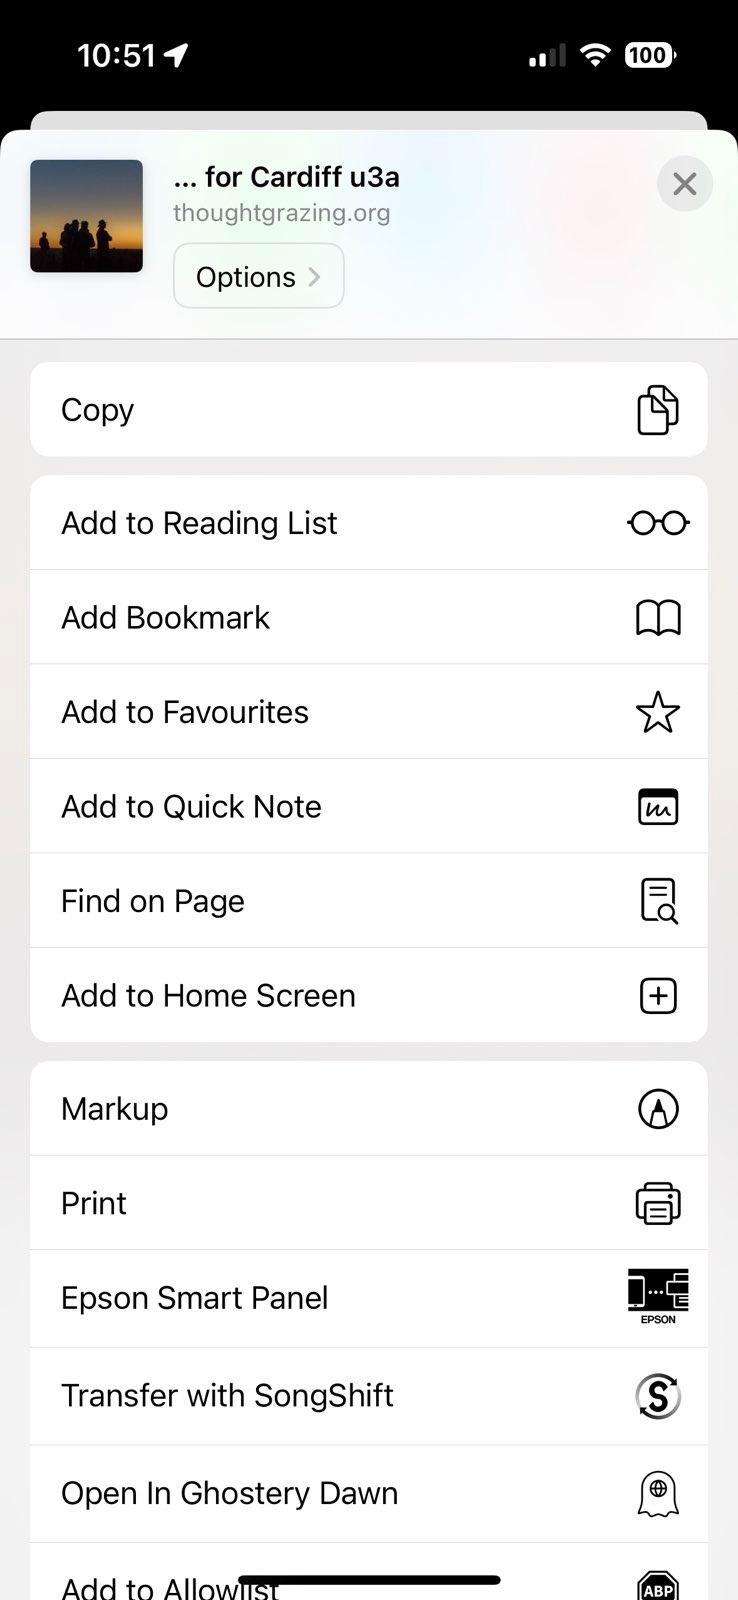
Did you know … you can create a shortcut to Thought grazing on an iPhone (probably similar on an Android phone) by pressing the Share button when you’re on a page you want to have a quick link to; and then selecting Add to Home Screen and possibly editing the suggested name; then moving it to where you can easily find it on your phone Home screen. You can setup any number of shortcuts this way to any website you frequently use.
Apple’s iCloud and Google Photos

A short post to highlight an issue that I wasn’t aware of, and now have to be very wary of. Indeed Ian’s comment about whether you need the Google Photos app installed on your iPhone is prescient – you most probably don’t if you’re backing-up photos to your iCloud account. And if you’re backing-up photos to a google account (as described in the earlier post), there are different ways of doing it which means you quite possibly don’t need the Google Photos app on your phone.
Remember, you can always look at the photos stored in the Google cloud from photos.google.com on your Apple phone or tablet – you don’t need the app installed.
So here goes … another learning point. I’ll type it in capitals so that you don’t miss it!
IF YOU DELETE PHOTOS FROM THE GOOGLE PHOTOS APP ON YOUR IPHONE OR IPAD AND IGNORE THE WARNING – THEY WILL BE DELETED FROM ICLOUD AS WELL.
There, I’ve said it. I didn’t realise it, and always shied away from deleting photos in Google Photos because I didn’t really understand what the warning meant. But now I do and obviously that’s not something I want to do, so how do I go about removing photos from the app, and/or from the Google cloud. Read on!

What I’ve researched is well summarised in the following article …
How to Delete Photos from Google Photos But Not from iCloud
and a couple of posts on the Google Photos support forum …
Does deleting photos in Google Photos also delete them from my iCloud photo Library?
Google Photos deleted my iCloud Photos library
So what do I take from this?
- If you want to delete photos from Google Photos – do it on the Google Photos website, not in the app on your iPhone or iPad. If you have synchronisation active, they will then be deleted from the app on your device as well.
- If you want to quickly delete all photos from your Google Photos app, just delete the app having first ensured that you’ve switched off Backup and Sync, because if you don’t, when you re-install the app, they will be synchronised back to your iPhone/iPad.
- If you don’t need the Google Photos app, uninstall the app, no photos will be deleted from your phone, they will still be in your Camera Roll and will have been stored on iCloud, nothing will be deleted from the Google Photos website either, so you will have to do that deletion from photos.google.com – see Case 1 above.
- An unlikely scenario, but one to be aware of – If you turn off iCloud before deleting photos from Google Photos on iPhone, then the photo will be removed from your device and Google Photos. It will stay on iCloud. However, if you enable iCloud again on the same phone, the photo will be removed from it too.
- And even more unlikely, but probably unexpected and a potential surprise – Disabling Backup and sync will not have any effect on your iCloud photos as it is just a setting to enable or disable backup service on Google Photos. If you disable it and then delete photos from the Google Photos app on your device, they will be removed from the device as you are technically deleting the device copy on your iPhone/iPad. And once it is deleted, the iCloud copy gets deleted automatically.
Remember. Google Photos in the cloud, and iCloud Photos do NOT work the same way. Apple aims to synchronise all images across all devices with “the master” being held in the cloud. The Google Photos app is just a portal looking into the images on the device, and synchronising (if chosen) those images with ones stored on photos.google.com.
I hope that makes it all perfectly clear 🙂 🙂 🙂
In summary, do not delete photos in Google Photos directly from your iPhone if you have both apps on the device. Use the Google Photos website to remove photos. It is suggested that you should delete a few photos initially. Then, check them in iCloud after some time. If the photos are still there, you can go ahead and delete them in bulk.
Google Photos and Apple revisited
This post is a sequel to the article (see link below) that I wrote in November, and reflects a little more of what I’ve learnt about the crazy world of how Apple Photos and Google Photos interact (or work) with each other. I’m pretty sure it won’t be the last.
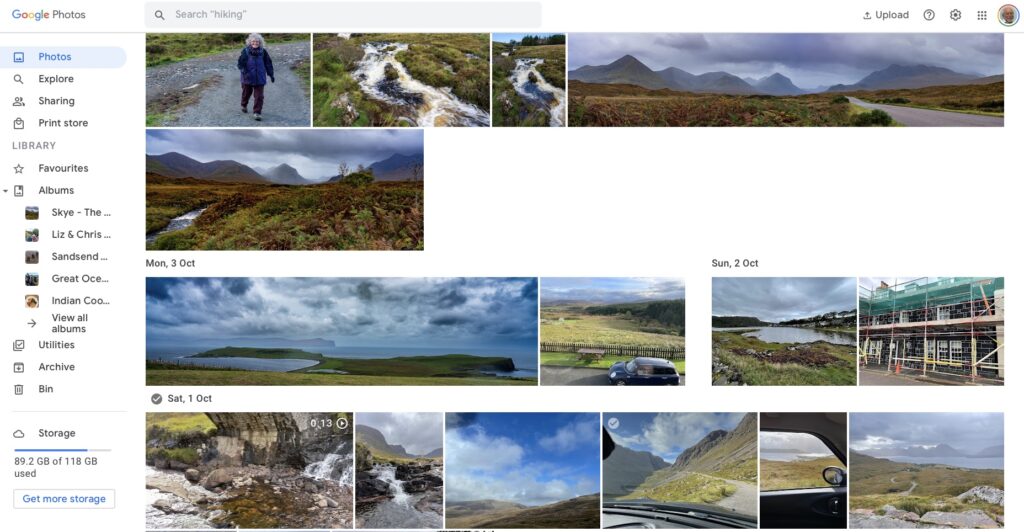
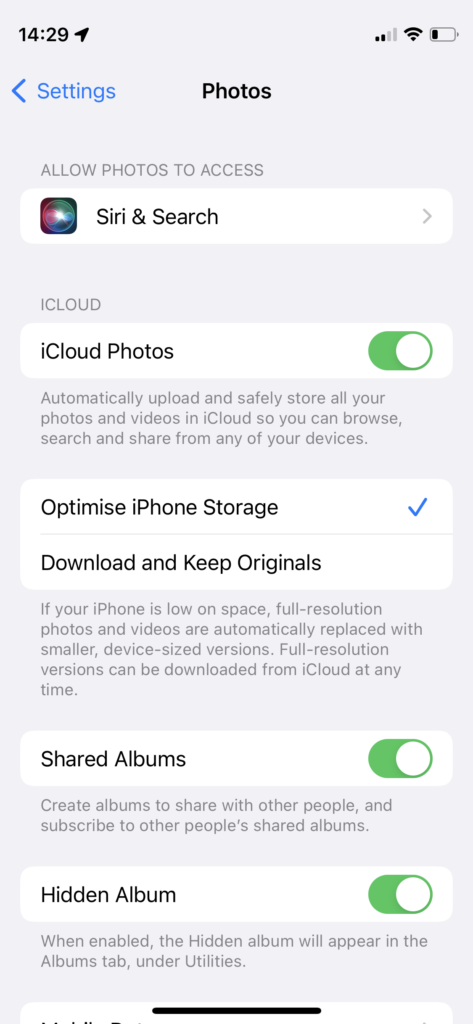
This one starts from an observation I made this morning that some recent photos I’d taken with my iPhone and which were in my Photos Library also seemed to have been added to Google Photos on my iPhone (but not my iPad) as well. From the outset let me assure you that this is the normal behaviour. You have to set Google Photos to see all the photos in your local Photos Library {Settings > Google Photos > Allow Google Photos to Access – All Photos} otherwise it can’t work. What you are seeing in Google Photos is the app getting a view of what’s in your Camera Roll on the iPhone/iPad – you haven’t added anything at this stage to the Google Photos app, and more importantly, nothing has been uploaded to Google Photos at photos.google.com.
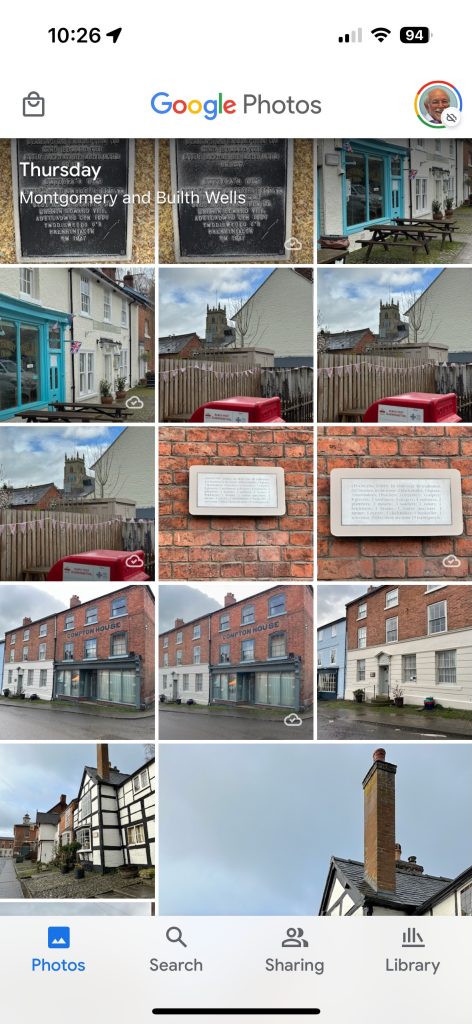
What I did see however additionally in Google Photos were some edits of recent photos that I’d done in Lightroom which I’d exported to my desktop, and then uploaded to photos.google.com. They could be identified by the little cloud icon on the picture.
It got me to thinking; what is the best way of sending photos from the iPhone/iPad to Google Photos – if I don’t want to sync everything using Google Backup (which as I explained in the previous post, I most certainly don’t want to do as they’ve already been backed up to iCloud). Am I doing it the best way?
Method 1
As above. Share (export) the photo from the iPhone/iPad to a chosen folder in the Files app or Google Drive, and then upload from that folder to Google Photos from photos.google.com (see also Method 3).
Method 2
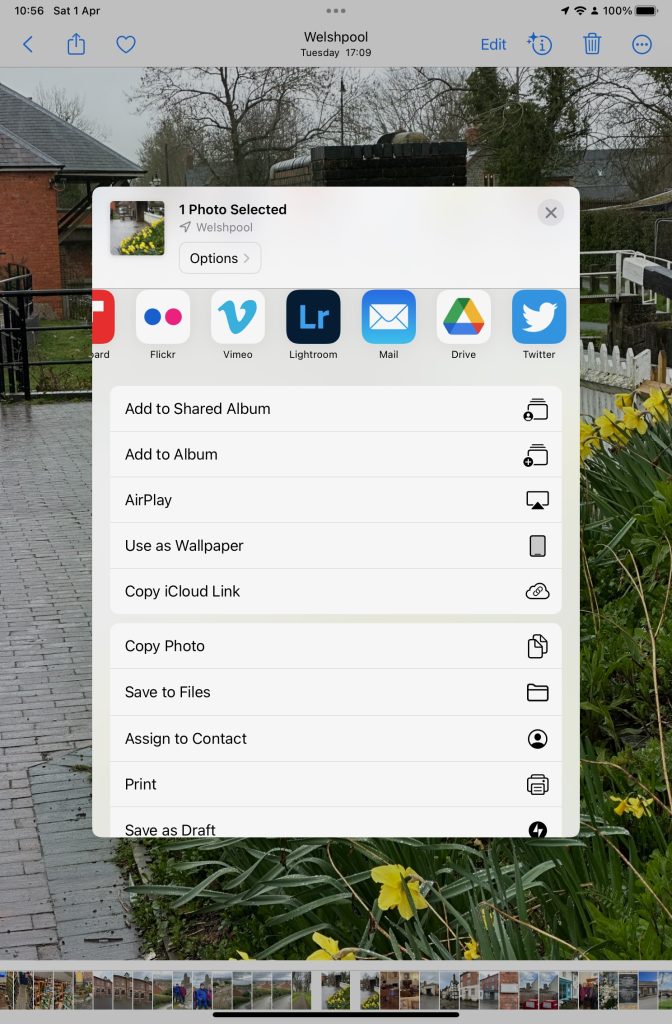
This is by far the easiest, and simplest way (and believe it or not I didn’t know you could do this). Open the Google Photos app on the iPhone, select a photo and then select the Upload (cloud) icon …


… the photo will be backed up to Google Photos (and photos.google.com); you will also note (see above) that once you’ve done that the Upload (cloud) icon is removed from the screen. In the Google Photos app, the photo will now have a cloud icon. Simple, eh!
Method 3
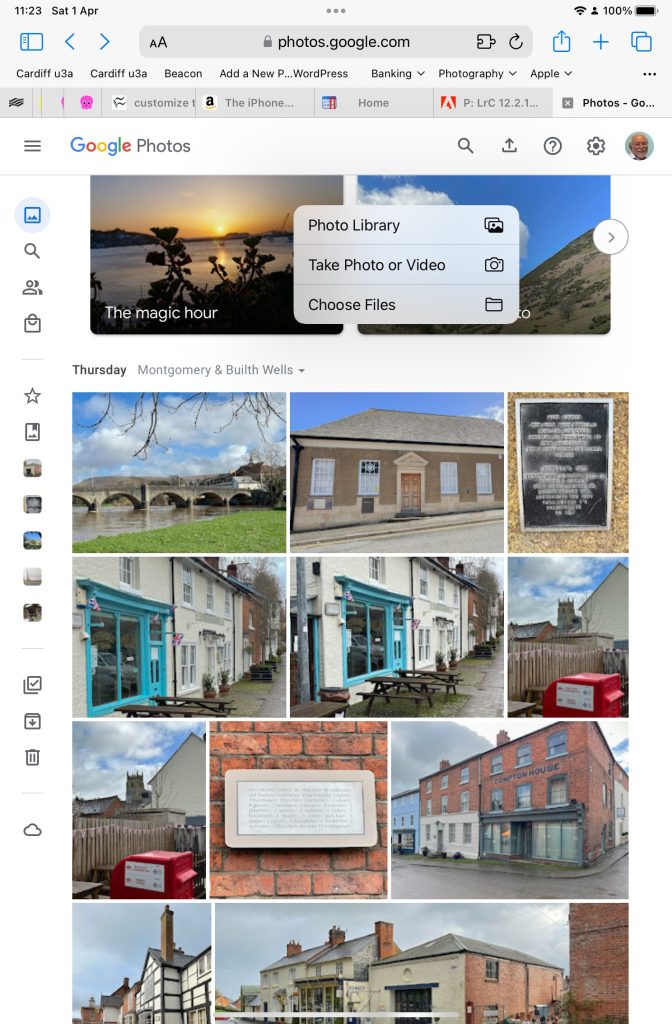
You can do the process in reverse. Go to photos.google.com and select Upload. You will be offered a variety of options …
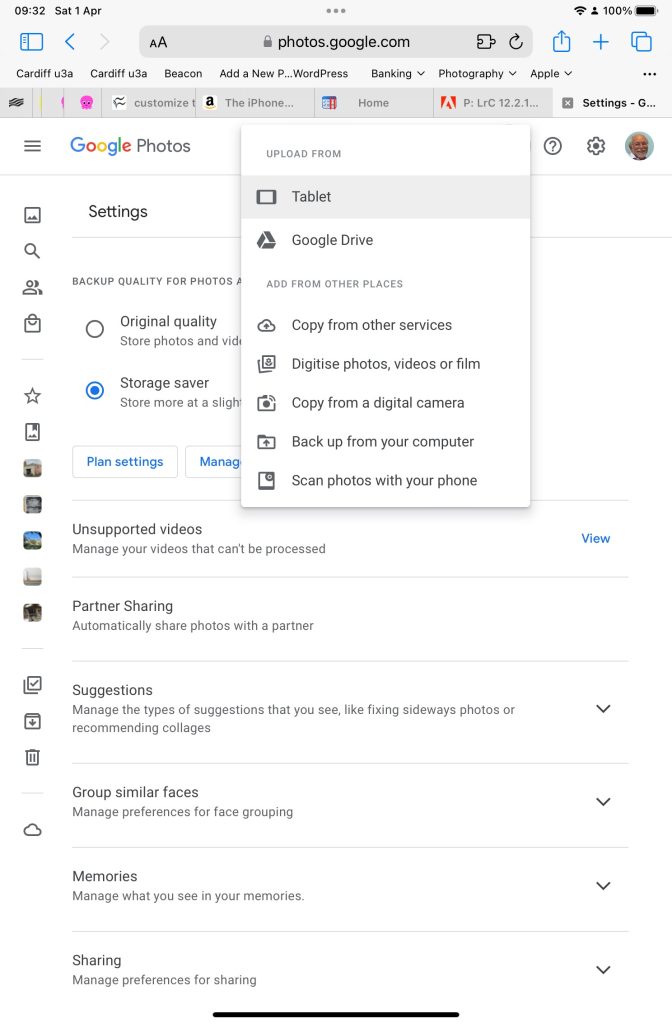
Choose (in this case) Tablet – as I was using my iPad to get the screenshots and you will get this dialogue …
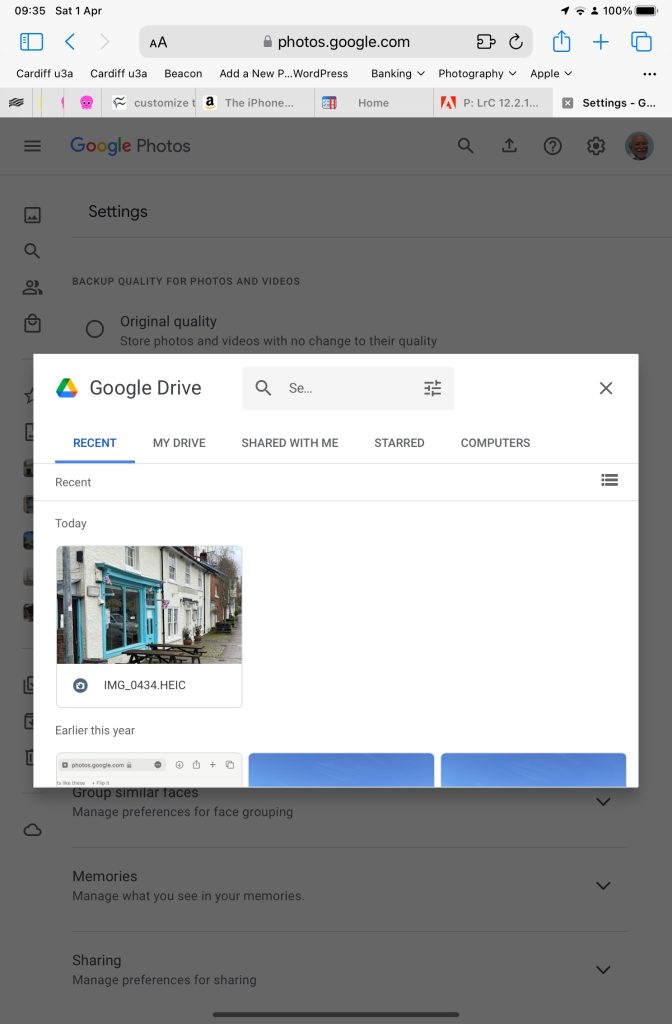
Choose Google Drive and you will get this dialogue …
Choose Copy from other services and you will get these options …
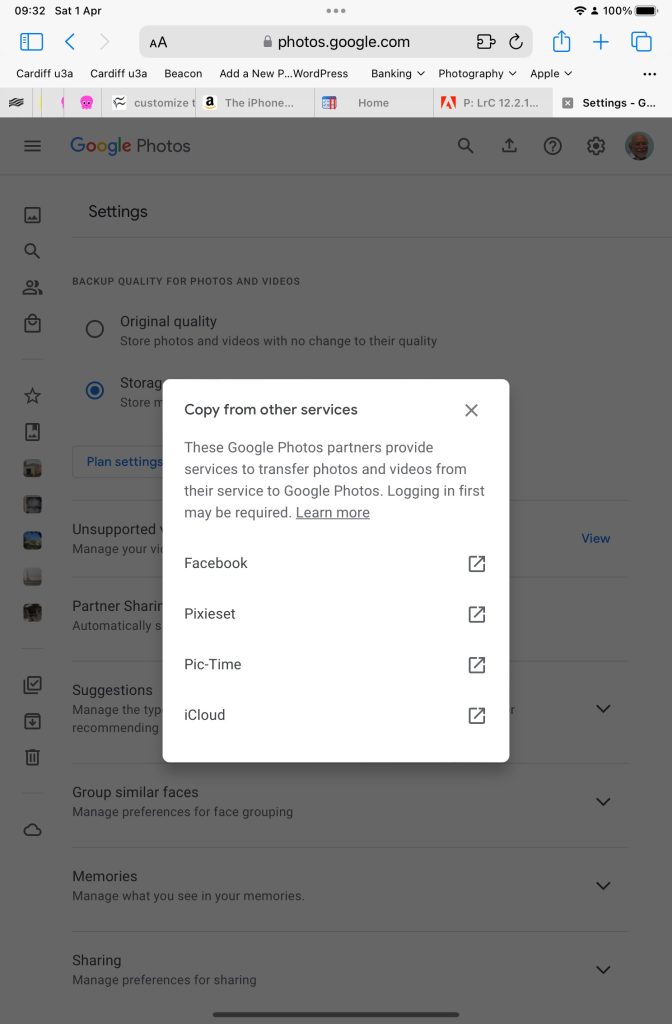
From which you can see (something else that I’ve learnt), that you can copy from iCloud – where all my iPhone photos are backed-up – to Google Photos. Duh!!!
What a wonderful (and complicated) world Google Photos is, and think – this was just prompted by me seeing photos in the Google Photos app I knew I hadn’t “uploaded” to Google Photos. Rest assured, they’re just views into the Apple Photos Library, not copies!!!
PS This isn’t an April Fool!!
Getting photos to the cloud(s) and back
This article is prompted by a combination of a casual enquiry about sending photos from your iPhone to Google Photos (hosted on a Google Drive), and my own discovery that I was backing-up iPhone photos to BOTH iCloud and Google Photos.
Observation one. Google Photos and iCloud Photos don’t work in quite the same way. Whereas you can access the Photos you may have stored on Apple’s iCloud storage from icloud.com through the iCloud Photos app, you cannot access Google Photos from drive.google.com directly – you have to go to photos.google.com to access them. Google Photos uses up some of your Google Drive storage – you get 15Gb “for free” with a Google account – but it’s a standalone application, in the same way as Google Mail is. It’s an important distinction. Google provides you with applications which make use of their cloud storage, Apple provides cloud storage alongside access to applications which use that storage and which synchronises back to devices.
Observation Two. This article concentrates principally on Google and Apple, because they are the two principal players in the Camera and Cloud Storage space. There are other cloud storage solutions on which you can store photos, eg Microsoft’s OneDrive, and Dropbox. I will only refer to these briefly at the end of this article. There are undoubtedly other cloud storage solutions, but I won’t be writing about them.
Observation Three. Anything I write about the link between Camera and Photos on an Android/Google system is second-hand knowledge, and I cannot verify it!
Observation Four – the final one. This article does not seek to cover the general topic of transferring photos from a phone to your computer. This is more than adequately covered in this article. I suggest you read it too.
Not wishing to be dismissive, but just because it’s so straightforward – I’m going to discuss Google Photos first. If you have an Android phone and thereby have a Google account, you automatically have 15Gb of cloud storage and the two are linked, and by default any photos you take on your phone are backed-up to your Google account. This is described well in the Google Support article. A couple of things are worth highlighting however: a) you can switch-off automatic back-up and synchronisation of your photos, in which case all backups would need to be done manually; b) you should carefully choose the “quality” of the photos you back-up – they may not be the same as that of the photo on your device; and c) it would appear that you could backup photos to a different account from your main one, thus adding to the free 15Gb you get with each account. [Alternatively, for £15.99 a year you could get an additional 100Gb of storage from Google. If you aren’t an Apple user this is definitely worth considering.]
It’s not that much more difficult if you want to save photos from your iOS (iPhone or iPad) device to the Google cloud storage. Again the Google Support article describes the process and the options quite well.
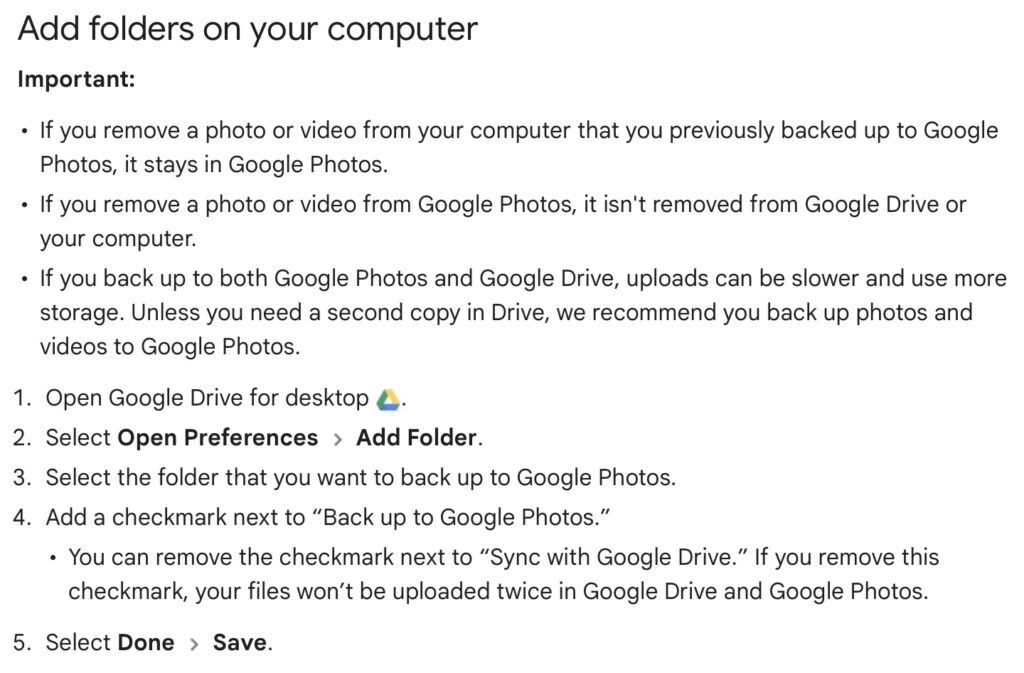
Similarly if you’ve transferred photos to your computer (eg from a camera SD-card), then Google’s got you covered to back-up and sync to their Cloud storage in this article. You should nominate a folder on your computer that Google Drive will monitor for newly added files which will then be backed-up and synced to either Google Drive, or to Google Photos, or both, depending upon the option(s) you’ve chosen.
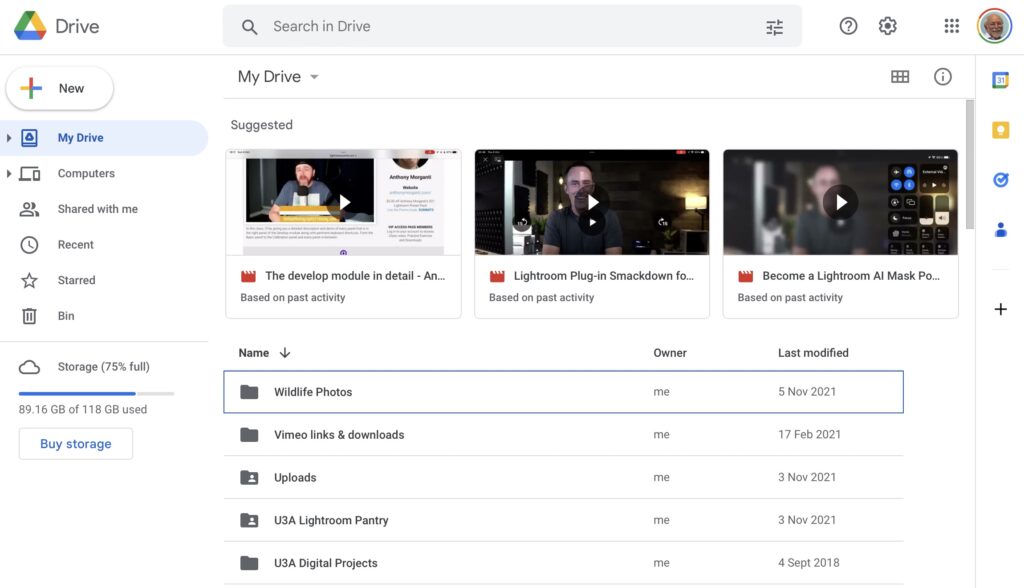
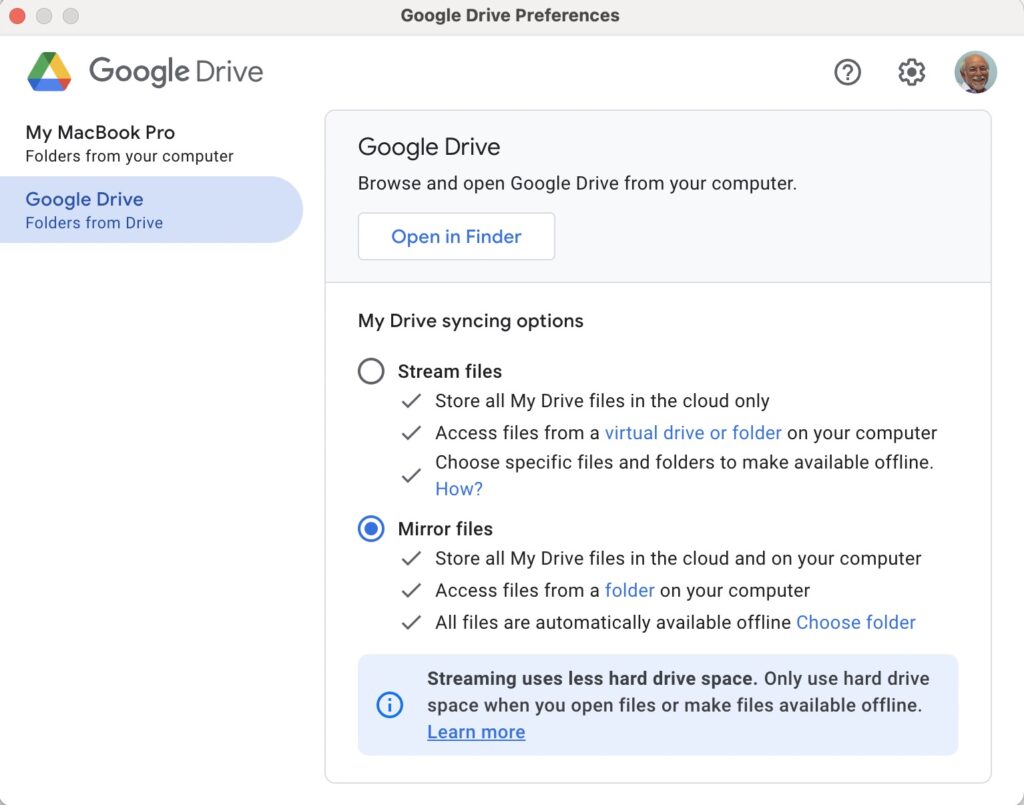
For this to work however, you do need to be sure you’ve a) installed the Google Drive on your computer, and b) you’ve set the preferences the way you want them. In my case, since I’ve increased the amount of Google storage I have, I’ve chosen to Mirror a folder (in itself called Google Drive) – then both the folder on the computer, and the one in the cloud should be exactly the same. A mirror in fact. Anything I add to (or edit on) my local Google Drive will be copied to my Google Drive in the cloud.
So we turn next to the Apple ecosystem. [I should feel more confident here, but as you may have noted that I disclosed at the start of this article that I was doing something extremely stupid and not noticing my idiocy.] Here the support page on Apple Photos and iCloud I think really does a good job of explaining your choices and how to set up backup to their cloud storage. I don’t think I can improve on it. But what if you’ve got Google Photos installed as well on your iOS device? This is where I made my foolish mistake. I enabled Backup and Sync on my iPhone and so I got TWO copies of every photo – one in my Google storage in Google Photos and the other in my iCloud storage. Duh!!!
Disabling the Backup and Sync left me with an image which was shared locally between the Google Photos and Apple Photos apps. How could I get that image (or group of images) onto Google Photos to perhaps share with friends or family?
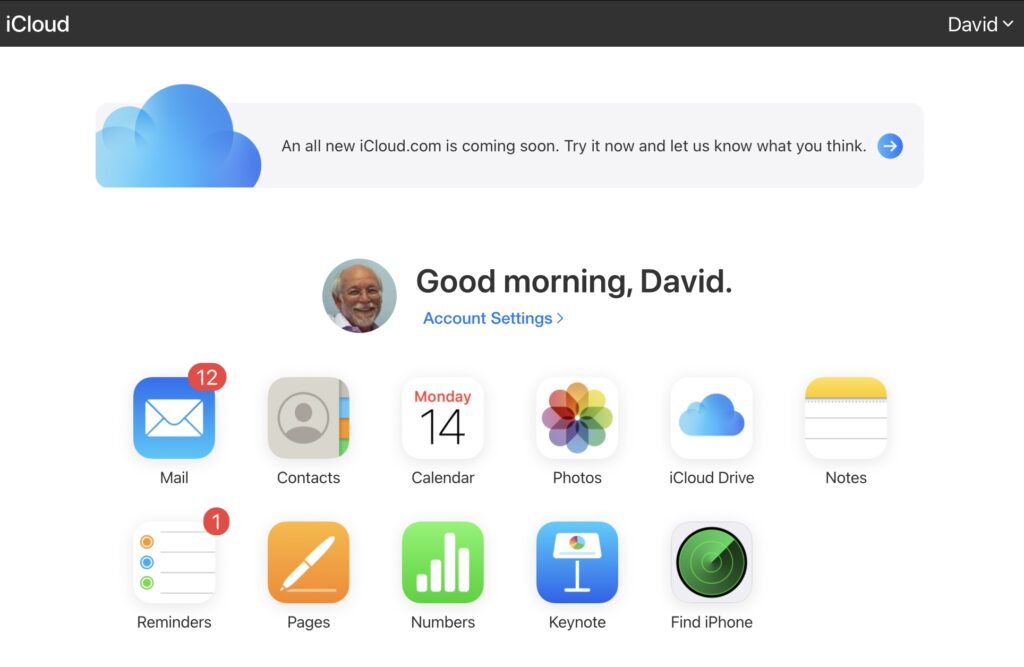
It turns out that there are two reasonably easy ways of doing this. By enabling iCloud Photos on the phone (or tablet) …
… I can then download from iCloud to a folder on my computer which I can then upload to Google Photos from. Really rather simple and not a use case for Google Photos Backup and Sync to be employed.
Alternatively, I could go into the Google Photos app, select the image I want to send to Google Photos in the cloud and Share it by getting a link and then sending myself a message. The act of sharing it copies the image to the cloud, from which I can then add it albums, etc.
Using either of these approaches allows you then to obtain a link for the album which you can then Share to a list of users, or obtain a link for public sharing.
Once you get the photos onto Google Photos the fun starts. It’s not intuitive what happens when you decide you want to delete them either from the cloud, or from your device. In fact it’s downright confusing. I’ve written about this in another place (the public Thought grazing) and life is too short to repeat anything on here that I’ve already written over there, and believe still to be correct. Best of luck!!!
The situation with deleting photos from Apple Photos and iCloud Photos is slightly more straightforward and I’ve written this up already, so won’t repeat it.
It goes without saying that keeping it all in the Apple ecosystem (for me) makes a lot of sense, and with the ability to share albums on the way – it’s not yet as sophisticated as the Google Photo Albums service – I may transition away from Google Photos altogether in time.
If you’re a PC Windows user with an iPhone, then a solution is beginning to appear that enables you to use the Windows Photo application with iCloud. You can install iCloud for Windows on your PC and then you should be able to manage your iPhone photos from your desktop.
For Dropbox users, you can setup an automatic upload of photos to the service. They even give you a bit more free storage if you enable this, or at least they used to!
iCloud Photos, Photos on Apple Devices and iCloud Drive
The seed for this topic was sown by Ian at our meeting on October 13th 2022. I had to admit that although I had a reasonable idea of what happened with Google Photos, I was unsure what happened with Apple’s cloud offering.
I was reasonable quick in advising (and it’s reported in the notes of the meeting), that as expected …
“I can confirm that deleting a file on iCloud Drive from the Files app on an iPhone will delete it from icloud.com and your iCloud drive on MacOS as well – which is what you would expect should happen.”
However, the situation of Photos stored in the Apple Photos app (on iPhone or iPad) and iCloud Photos should also be noted – for completeness.
I’m not going to write anything; just provide three links to follow to clarify …
How to Delete Photos From iPhone but Not iCloud
How to Delete Photos From iCloud (While Keeping Them on Your iPhone)
and
How to recover a deleted photo or video on your iPhone or iPad
If you want to delete a Photo from both device and iCloud Photos. Just ensure Sync is left on and then you can delete the image from either the device or icloud.com
Having confirmed all this, and having more storage space on iCloud, and understanding that sharing Photo Albums is about to come to Apple Photos, and having checked that Sync’ing does seem to be working for iCloud Photos (from my Apple devices), I checked my Google Photos settings settings and switched-off Back up and Sync. I was doing far too many cloud backups!!! Always worth checking. If I want a Photo to be on Google Photos (for sharing for instance), I will now Upload, not rely on syncing.