This post starts from this paragraph in an earlier post on my personal blog …
“How might I integrate my digital music in a better way than I was currently doing it via the Apple TV, and iTunes on the MacMini? The answer … a Sonos Connect system with RCA output to the Marantz amp connected to the iTunes Media folder and a copy of the iTunes Library hosted on a USB-3 disk connected to an AirPort Extreme router. [The master iTunes Library is shared (using Dropbox) around the other 3 Macs in the house – a brilliant solution to avoid maintaining different iTunes Libraries.] I can now listen to the digital music in all three rooms. Of course, now I have a Sonos Connect, I can stream to other Sonos Play speakers … but that’s for another day, which may actually come sooner rather than later.”
… which formed the subject of my discussion with the Cardiff U3A Digital Group on the 4th January. But I digress … what is the problem with iTunes?
iTunes was introduced shortly after the first iPods as the way/means by which you could store/search for your music on your brand-new revolutionary personal digital music device. And there you have the problem almost defined in a nutshell. It was “enhanced” to add other media to it – video, TV, film, podcasts; and you could synchronise your device to a computer so that the database work could be done on a more friendly device; and with the introduction of the iTunes Store – the focus has switched to selling music and storing it in Apple’s iCloud. But it’s huge problem is that it’s old, and it’s personal – tied and linked to single portable devices. You have more than one device – you have to synchronise them separately unless you rely on playing from iCloud – and the options here are very confusing; you have more than one playlist – you have to copy them to different devices; you want to have all your media in one place – you have to make sure you have your iTunes settings correct otherwise you’ll never know where the media your playing is actually stored.
So the link in the quote above provides an ingenious solution if you want to create a shared iTunes Library when you have more than one device you want to reference a single iTunes Library from. It really does work, and I’ve used this solution for a few words, and until recently I had little trouble from using this method, using my MacMini as the main computer for doing the sync’ing with my iPhone etc. However, after that episode I began to think there must be a better way.
I really didn’t want to use Spotify because that would only serve me music, and in any case most of the music I wanted to listen to, I already had and had transferred from CD to digital.
I researched whether I needed to buy more hardware, decided I didn’t, and opted to install Plex on my MacMini, with the media stored on an external USB-Disk. Doing this meant that I could continue using iTunes as well as the Plex Media Server as it looks at the same disk and media folders. And the advantages?
Well the most remarkable is that after purchasing a Plex Pass (the server itself is free) I can access any of my purchased and stored media – films, videos, music, photographs – from anywhere – wherever I am, on any device I have installed the Plex player app – including my Apple TV. It can operate over wired, WiFi and cell connections (if enabled). Isn’t that amazing? Plex is also moving towards streaming its own, or licenced content and offering a LiveTV service. Please read the Wikipedia article for more information.
It really is very easy to setup!
Google Photos – how I use it
As promised, and apologies for the delay – Christmas and illness got in the way – here are some notes on how I’ve got Google Photos to work for me. It concentrates mainly on how I’ve configured Backup and sync to do what I want it to do. I think the editing of photos is relatively straightforward, as is creating albums and slideshows. I may get round to doing something on the latter, as I might with sending photos for printing – that’s quite a good topic. I’ve used Snapfish and Yophoto for printing photos and books, both of which I can recommend. I now use Blurb, but that’s because it works so well with Lightroom – it’s more expensive than the other two.
Some more links, if you’re interested …
25 tricks to master Google Photos – https://www.pcmag.com/feature/345998/25-tricks-to-master-google-photos
How to master Google Photos – https://www.theverge.com/2017/6/9/15762170/google-photos-how-to-master
32 tips and tricks for Google Photos – https://www.computerworld.com/article/3148245/desktop-apps/32-tips-and-tricks-for-google-photos.html
Getting to grips with Google Photos
It really is rather surprising that given the widespread adoption and use of Google Photos, that I can not find a sensible, easy to read, introductory guide on how to use it. Perhaps it’s because it’s so easy to use? Well, it is – up to a point. That point being how it works alongside Google’s other cloud-based software, ie Google Drive and Backup and Sync, and the now defunct and disconnected Picasaweb – where your photos are still accessible in your Google Archive.
So this note is an attempt to set out what you can do with Google Photos using images obtained on your phone or tablet, or uploaded from your camera’s SD card. It will principally work from the principle that you’ve taken the photos, you want to upload them to your laptop or desktop (PC or Mac) and then want to work on them there using a web browser. That is not an essential workflow, you can do everything on your mobile device – if that’s where the photos are, even down to editing the photos using Google’s Snapseed application for iOS, or Android devices, it’s just the approach I’ve taken here. So if you want to do everything on your iPhone/iPad or Android device you can learn how to use Snapseed on iOS here, I believe the application is nearly the same on Android.
To avoid duplication of effort however, here is an article that you should read first. It covers nearly all the features of the device apps, and the web browser version, and in particular handles some of the editing functions available, but it doesn’t cover the intricacies and peculiarities of the Backup and Sync tool.
So … how do you get photos into Google Photos? This Google article tries to explain how you can use Backup and Sync to do that. How does Google Photos work with Google Drive? This Google article attempts to explain how. Confused, I thought you would be! This is what I’ve done, why I’ve done it and perhaps most importantly how I do it!
Sometimes, it’s best to work backwards from Google’s most recent announcement because in doing that you can be reasonably sure you’ll be moving in the right direction … forwards! Google has separated Photos from Drive and is encouraging users to deal with them separately. It’s a continuation of the separation which started when Photos was spun out of Google+.
So how do I get my photos into Google Photos? From the iPhone/iPad (or any other smartphone that has the Google Photos app) it’s quite straightforward.
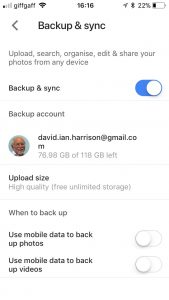
From the menu icon, choose Settings, enable Backup & sync and then make decisions as to the quality of the images, and when they’ll be backed up (uploaded). I have opted to use the High Resolution storage option, and for them only to be uploaded when connected to a WiFi network. The reasons for this are that my main photo software is Lightroom and I have a different method of working with that. What I want to use Google Photos for is essentially sharing albums with family and friends.
From my desktop/laptop it’s almost as straightforward. I connect the camera by USB cable to the computer, or insert the SD card from the camera into the SD card reader in the computer and I will be prompted with this message …
They should then get uploaded to Google Photos and the images can be seen in my Google Drive as an entry under USB Devices & SD cards, from which I could copy them to a folder on my Google Drive – I don’t recommend you do this.
So there you have it. I’ve disentangled Google Photos from Google Drive; I’ve used Backup and Sync to upload photos to Google Photos and I’m now ready to edit photos, create albums and share images through Google Photos.
Finally … if you were a user of Picasa and Picasaweb, your photos are still accessible. What you can, and cannot do with them is recorded in this Google Help document. You can still download and use the PC or Mac Picasa desktop client for editing your pictures and if you want a simple photo-editing tool to get started with as long as you’re using a 32-bit operating system (ie not Apple’s Catalina or later), it’s a good place to start, but, it is no longer linked to Google Photos (or Picasaweb). However, there is a workaround!
When you save an image that you’ve edited in Picasa, you can save it to a folder that will then be automatically scanned by Backup and Sync and thus uploaded to Google Photos.
[NB Only those who attended my two sessions on Google Photos will actually understand why I included the really uninteresting image at the top of this post – I’ll leave the rest of you to ponder on what could possibly be the reason 🙂 ]
Meltdown and Spectre: How chip hacks work
I was unable to explain that well how these vulnerabilities in the Intel chips was being exploited. On the plus side I didn’t say anything that was incorrect, but here’s a reasonably readable description of the problem and it’s implications to us all.
Developments (generally rather expensive) in Digital TV display technology
In my breathless tour of Digital TV this week, I didn’t mention developments (generally rather expensive) in display technology – I should have. Along with 4K/UHD resolutions increasing the number of pixels on your screen, LG, Panasonic and Sony are introducing anew display technology called OLED whilst Samsung are promoting their alternative rather confusingly called QLED.
The article below explains the difference between the two technologies, and if you’ve got the dosh, you could trot along to John Lewis and buy one …
https://www.howtogeek.com/327047/whats-the-difference-between-oled-and-samsungs-qled-tvs/
Problems with Two-factor authentication on a Mac during a recent upgrade
John raised the problem he’d had with implementing Two-factor authentication on his Mac during a recent upgrade (to High Sierra, I think). Now Two-factor authentication is generally a good thing when you’re talking about access to cloud based services, eg OneDrive, eMail, Google Drive, iCloud – but it seems a bit OTT when you’re talking about an operating system as protection to prevent access to services running on the hardware. But Apple doesn’t make this clear.
When I was doing my High Sierra and iOS upgrades the other day I was prompted to ask whether I wanted to implement Two-factor authentication, but was also advised that some of my devices wouldn’t support it and I would lose access to services if I chose to implement it. That was enough to warn me off, so I didn’t. John was not scared off – possibly because he didn’t get the warning that I got – and has had to make a trip to the Apple Store to try and get it sorted.
Two-factor authentication is a “good idea”, don’t get me wrong, but Apple’s implementation is a bit clunky it would appear.
Protecting a USB stick
The subject of protecting a USB stick came up – I’d forgotten to provide the solution! As I suggested, in an earlier post, the answer is to create a Folder on the USB stick and protect the folder, not the stick.
Two articles here I think provide the solution. The first one proposes encrypting the contents and is probably the easiest, you must remember the encryption key though!!
A number of other alternatives are also provided in the second article …
http://www.makeuseof.com/tag/password-protect-folder-windows/
… for me. I’d prefer to put stuff I’m worried about on a USB Disk (not a stick) and use the security software provided by the drive manufacturer, eg Western Digital.
http://www.tomshardware.co.uk/faq/id-3114794/password-protect-folder-windows.html
Spams and scams
In the meeting yesterday the quite common topic of spams and scams came up, as did the enquiry “Can I find out whether one of online accounts could have been compromised” – these are the ones that you should consider changing your password, if you haven’t already.
Martin Lewis’ website – Money Saving Expert provides a comprehensive guide to all things scam, and includes a link to the “Have I been Pwned” website which tells from your email (account) address whether there are any websites you subscribe to which have been hacked. Try it … hopefully you’ll get a null result!! If you don’t, don’t panic. Look at the date of the compromise. It could be that you’ve already changed the Password.
The second article is from Which? Always a good resource to check, even its “free” pages …
Finally, Martin Lewis mentions the use of a Password Manager to remember your passwords and even to generate secure passwords – I don’t use that facility with LastPass – the password manager I use, rather preferring to use the “template” approach I describes a couple of weeks back.
Difficulties/problems of running Google’s Backup and Sync as a Service
I shared with the Tuesday group some of my difficulties/problems of running Google’s Backup and Sync as a Service which runs at Start-Up. It appears that this is not a problem, but a design feature – no doubt created by Microsoft. You can do this on the Mac, but apparently not on a Windows 10 machine.
The article below explains how you can get round this difficulty. For myself, I’m just going to have to remember to right-click the Backup and Sync Icon and run the application as Administrator every time I login. Sometimes, the simple solutions are the easiest!!!!
https://www.coretechnologies.com/products/AlwaysUp/Apps/RunBackupAndSyncWindowsService.html
Which External USB drive would I recommend?
That was a question from the last meeting that I promised to answer. Well, I read a number of reviews and I was pleased to see that my favoured choice is still amongst the highest rated.
I would recommend any of the Western Digital My Passport drives. They are supplied with security software so that you can password them as well. I would also recommend buying a carrying-case for any that you intend to carry around. The one I use is from a company called Case4Life. Both can be obtained from Amazon – which is where I bought mine from – the disk itself is c.£55 for 1Tb, but you can get 2Tb, 3Tb and 4Tb versions.