I’ve posted articles on using Google Photos a few times. Of course with the passage of time, features, and interfaces, change, so it is always useful to just review “what’s occurring”, and see whether there’s anything that needs correcting, or adding to. I will try and go back and edit the posts listed below to reflect changes that I’m aware of.
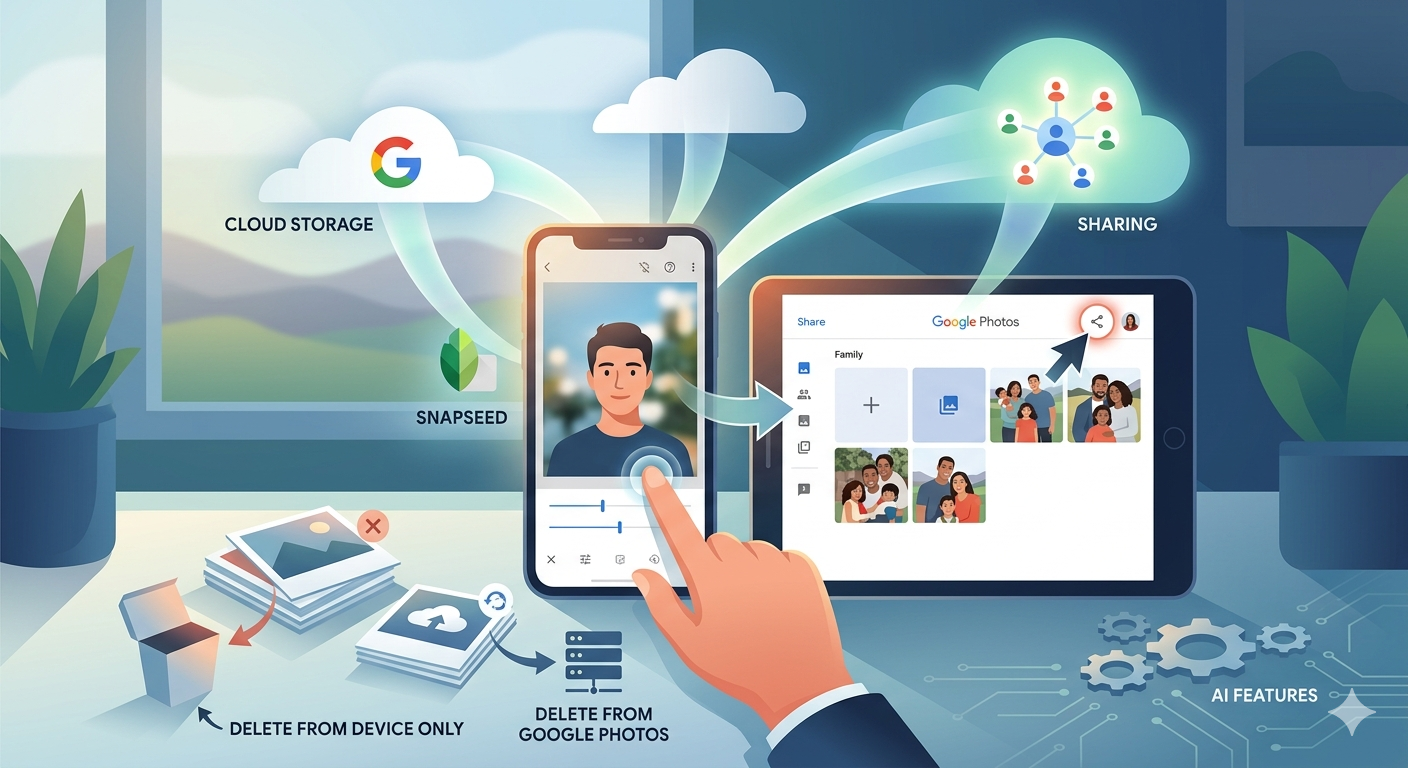
First and foremost it’s important to note that I don’t tend to use Google Photos for anything other than sharing photos with family and friends, so my use of the editing features is a bit limited. I am however a strong advocate of using Snapseed (available from both the Google Play, and Apple App Store) as a photo editor, but as it works best with the Google Photos app, it’s necessary to install Google Photos as well. [Snapseed is not available as a native desktop app on Windows or MacOS; it’s only available on mobile devices (Android and iOS/iPadOS).] So the first link that’s important to be aware of is this one …
Google Photos and Apple revisited – if you’re an Android user you can skip this article and move to the next paragraph – all your photos taken with your camera will be safely housed in the Google Photos app!!! If you’re an Apple user it’s important to understand how synchronisation works with Google Photos and the Photos app on iOS. If you’re not careful you can either end up with duplicate photos on both platforms, or worse still deleting photos from a device thinking that there’s a copy “in the cloud”.
The next bit of housekeeping is to understand what happens if you want to delete a photo from Google Photos – it’s not entirely straightforward (but it is easier than in the Apple world!!!). This article I wrote – “How do you delete photos from Google Photos?” – attempts to help you delete what you want to delete from your device, or from Google Photos on the web. This is particularly a problem if you’re an Apple user with a Camera Roll, rather than an Android user with Google Photos – so you’d be advised to read it.
So we finally get to editing our photos and using Snapseed. This article – “Snapseed and Google Photos” – is a good overview and will take you quite a way down the road of installing Snapseed, it covers the basics of how to get photos from a camera (rather than a smart phone) into Google Photos, and some basic editing of a photo. There are also links in the article to earlier posts on using Google Photos as well as a video on “getting started” and some additional references that I found useful.
The new stuff!
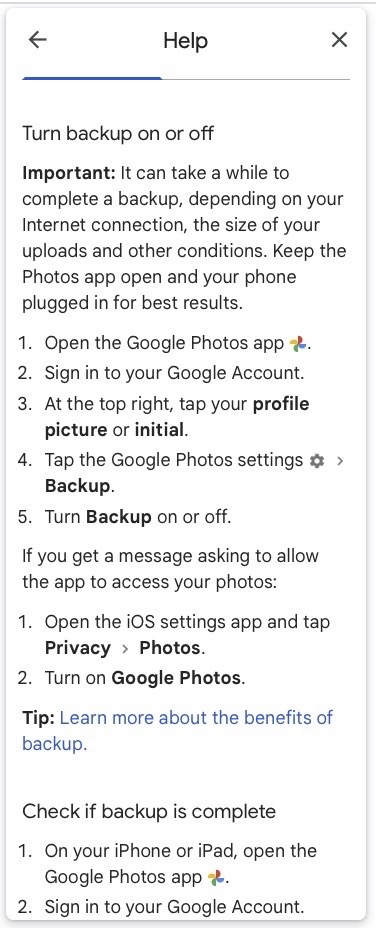
How To Use Google Photos: The Ultimate Beginner’s Guide [2023] – if you want to just stick with what’s possible for you to do in Google Photos this is just about as good a guide as you’ll get. It goes through all the features of the app, but doesn’t cover editing photos in any detail. If you want a video that covers the same ground, you might like to watch this[I’d like to remind you of the point I made about his reference to Backup and Sync if you’re an Apple user – my earlier comments apply!!! He has decided to use both iCloud and Google Photos on the web for two backups.]. Google’s help guide to editing photos is provided here.
So we turn to Snapseed – here’s a beginner’s video on how to use Snapseed for editing, you should also refer to the article quoted in the earlier post – Complete Guide To Using Snapseed To Edit Your iPhone Photos – from which I also recorded the video from my computer screen, but it’s obviously better using the link from the article. Also please note that although iPhone is mentioned in the title, it’s 100% applicable to Android phones as well. Finally you might probably want to look at this – SNAPSEED: ULTIMATE USER GUIDE + TIPS (2024 UPDATE) – if I’ve convinced you that Snapseed is the “goto” app for photo editing on your smart device.
Google is always updating its apps, and this is particularly true now that we have AI. So a recent update introduces the possibility of background blur – which can make a portrait of a person stand out more, by weakening the effect of the background. Google writes about its new AI features here, and here,
Finally … this article has been all about using Google Photos, which might have let you think that Apple’s Photos app is not so good. In a forthcoming post, I will be examining how Apple Intelligence (available in the autumn) will quite possibly revolutionise Apple’s photo applications, and will for some, if not all, Apple users mean they might be less likely to use Google Photos going forwards. They’ve already moved to allow the sharing of albums stored in iCloud to anyone via a link. That’s progress!!!
A short post to highlight an issue that I wasn’t aware of, and now have to be very wary of. Indeed Ian’s comment about whether you need the Google Photos app installed on your iPhone is prescient – you most probably don’t if you’re backing-up photos to your iCloud account. And if you’re backing-up photos to a google account (as described in the earlier post), there are different ways of doing it which means you quite possibly don’t need the Google Photos app on your phone.
Remember, you can always look at the photos stored in the Google cloud from photos.google.com on your Apple phone or tablet – you don’t need the app installed.
So here goes … another learning point. I’ll type it in capitals so that you don’t miss it!
IF YOU DELETE PHOTOS FROM THE GOOGLE PHOTOS APP ON YOUR IPHONE OR IPAD AND IGNORE THE WARNING – THEY WILL BE DELETED FROM ICLOUD AS WELL.
There, I’ve said it. I didn’t realise it, and always shied away from deleting photos in Google Photos because I didn’t really understand what the warning meant. But now I do and obviously that’s not something I want to do, so how do I go about removing photos from the app, and/or from the Google cloud. Read on!
Scary, eh?! Take care when deleting photos from your iPhone
What I’ve researched is well summarised in the following article …
If you want to delete photos from Google Photos – do it on the Google Photos website, not in the app on your iPhone or iPad. If you have synchronisation active, they will then be deleted from the app on your device as well.
If you want to quickly delete all photos from your Google Photos app, just delete the app having first ensured that you’ve switched off Backup and Sync, because if you don’t, when you re-install the app, they will be synchronised back to your iPhone/iPad.
If you don’t need the Google Photos app, uninstall the app, no photos will be deleted from your phone, they will still be in your Camera Roll and will have been stored on iCloud, nothing will be deleted from the Google Photos website either, so you will have to do that deletion from photos.google.com – see Case 1 above.
An unlikely scenario, but one to be aware of – If you turn off iCloud before deleting photos from Google Photos on iPhone, then the photo will be removed from your device and Google Photos. It will stay on iCloud. However, if you enable iCloud again on the same phone, the photo will be removed from it too.
And even more unlikely, but probably unexpected and a potential surprise – Disabling Backup and sync will not have any effect on your iCloud photos as it is just a setting to enable or disable backup service on Google Photos. If you disable it and then delete photos from the Google Photos app on your device, they will be removed from the device as you are technically deleting the device copy on your iPhone/iPad. And once it is deleted, the iCloud copy gets deleted automatically.
Remember. Google Photos in the cloud, and iCloud Photos do NOT work the same way. Apple aims to synchronise all images across all devices with “the master” being held in the cloud. The Google Photos app is just a portal looking into the images on the device, and synchronising (if chosen) those images with ones stored on photos.google.com.
I hope that makes it all perfectly clear 🙂 🙂 🙂
In summary, do not delete photos in Google Photos directly from your iPhone if you have both apps on the device. Use the Google Photos website to remove photos. It is suggested that you should delete a few photos initially. Then, check them in iCloud after some time. If the photos are still there, you can go ahead and delete them in bulk.
This post is a sequel to the article (see link below) that I wrote in November, and reflects a little more of what I’ve learnt about the crazy world of how Apple Photos and Google Photos interact (or work) with each other. I’m pretty sure it won’t be the last.
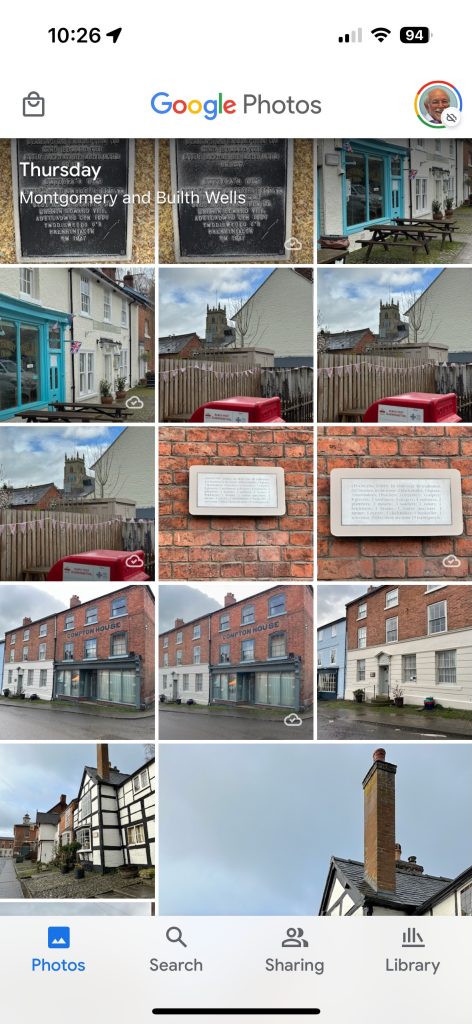
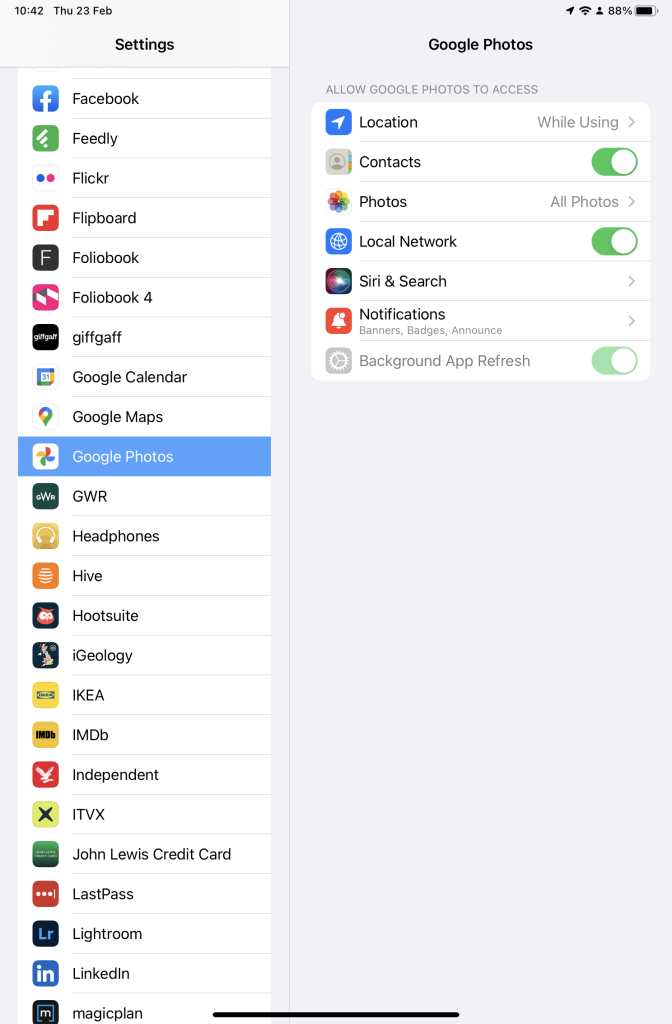
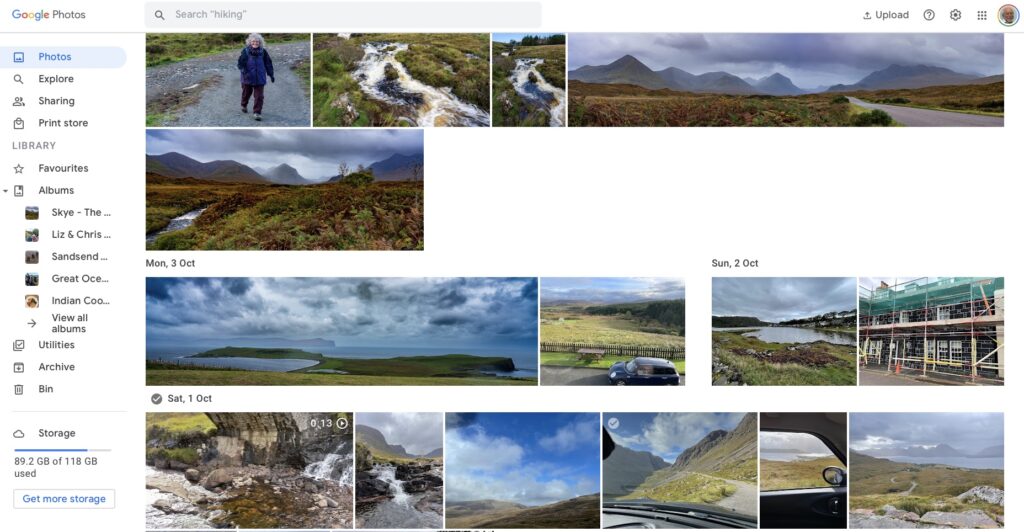
This one starts from an observation I made this morning that some recent photos I’d taken with my iPhone and which were in my Photos Library also seemed to have been added to Google Photos on my iPhone (but not my iPad) as well. From the outset let me assure you that this is the normal behaviour. You have to set Google Photos to see all the photos in your local Photos Library {Settings > Google Photos > Allow Google Photos to Access – All Photos} otherwise it can’t work. What you are seeing in Google Photos is the app getting a view of what’s in your Camera Roll on the iPhone/iPad – you haven’t added anything at this stage to the Google Photos app, and more importantly, nothing has been uploaded to Google Photos at photos.google.com.
What I did see however additionally in Google Photos were some edits of recent photos that I’d done in Lightroom which I’d exported to my desktop, and then uploaded to photos.google.com. They could be identified by the little cloud icon on the picture.
It got me to thinking; what is the best way of sending photos from the iPhone/iPad to Google Photos – if I don’t want to sync everything using Google Backup (which as I explained in the previous post, I most certainly don’t want to do as they’ve already been backed up to iCloud). Am I doing it the best way?
Method 1
As above. Share (export) the photo from the iPhone/iPad to a chosen folder in the Files app or Google Drive, and then upload from that folder to Google Photos from photos.google.com (see also Method 3).
Upload from iPhone/iPad Camera Roll to a variety of services
Method 2
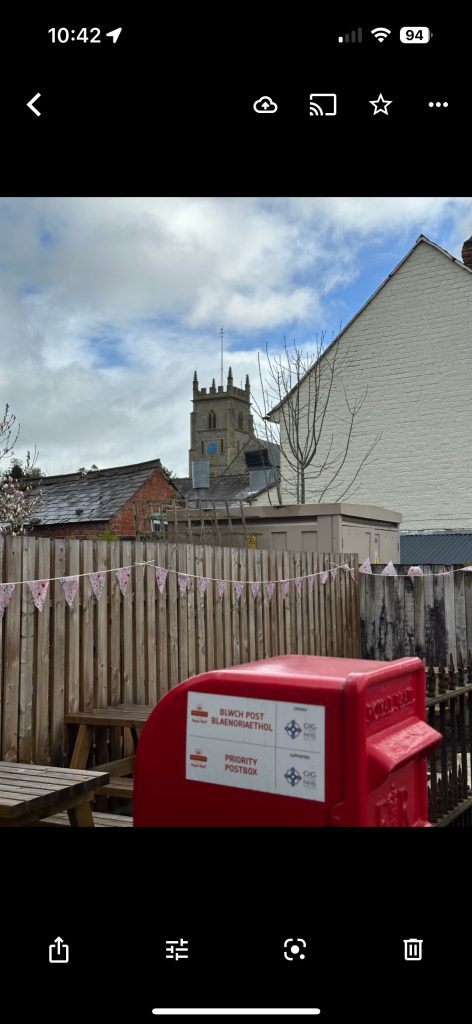
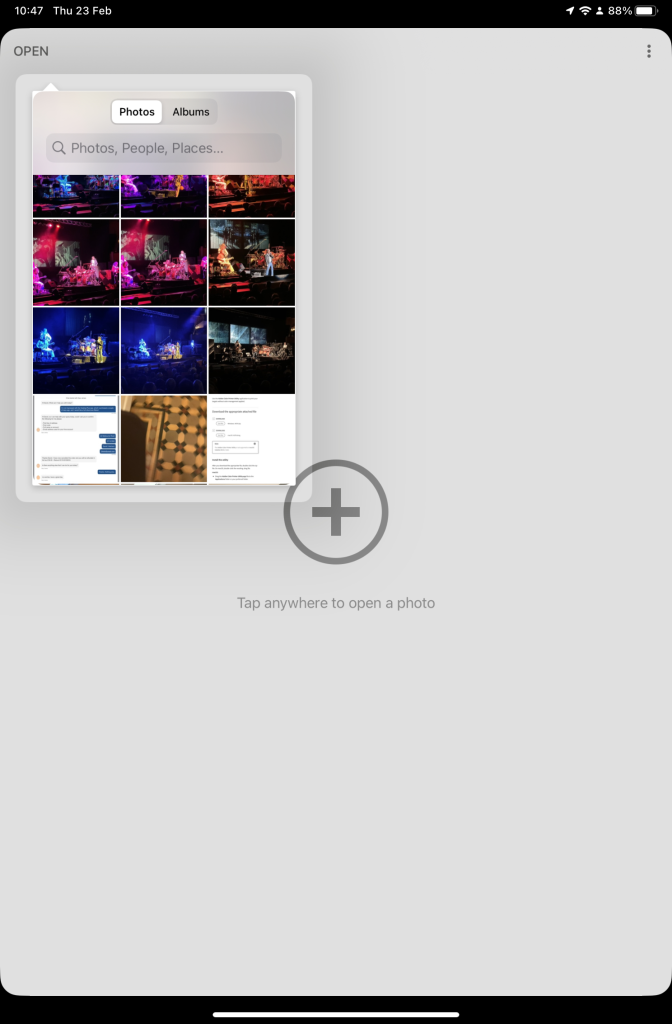
This is by far the easiest, and simplest way (and believe it or not I didn’t know you could do this). Open the Google Photos app on the iPhone, select a photo and then select the Upload (cloud) icon …
… the photo will be backed up to Google Photos (and photos.google.com); you will also note (see above) that once you’ve done that the Upload (cloud) icon is removed from the screen. In the Google Photos app, the photo will now have a cloud icon. Simple, eh!
Method 3
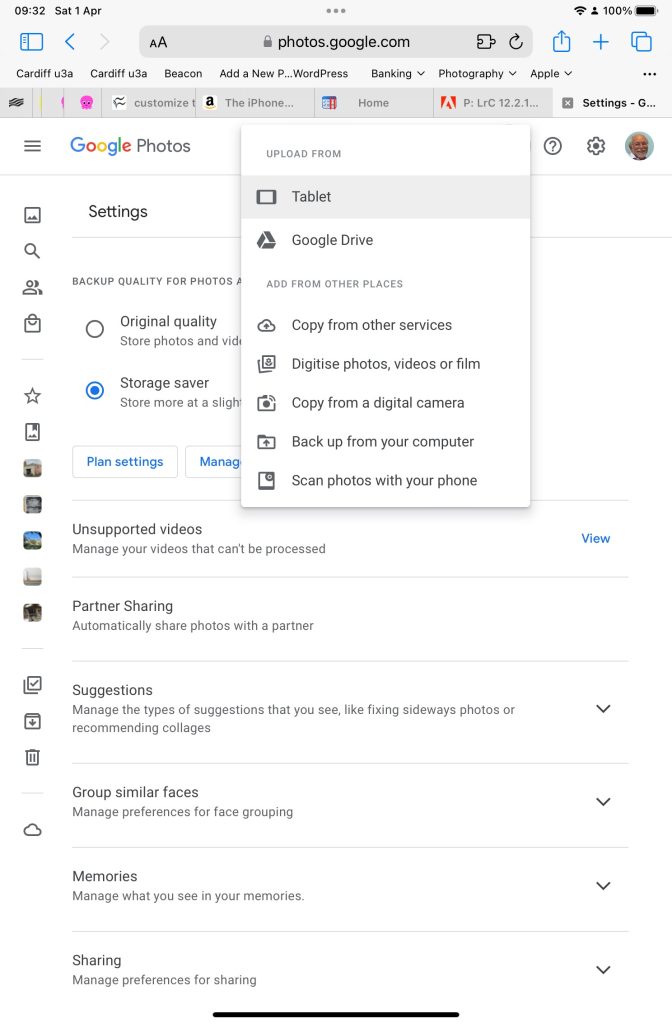
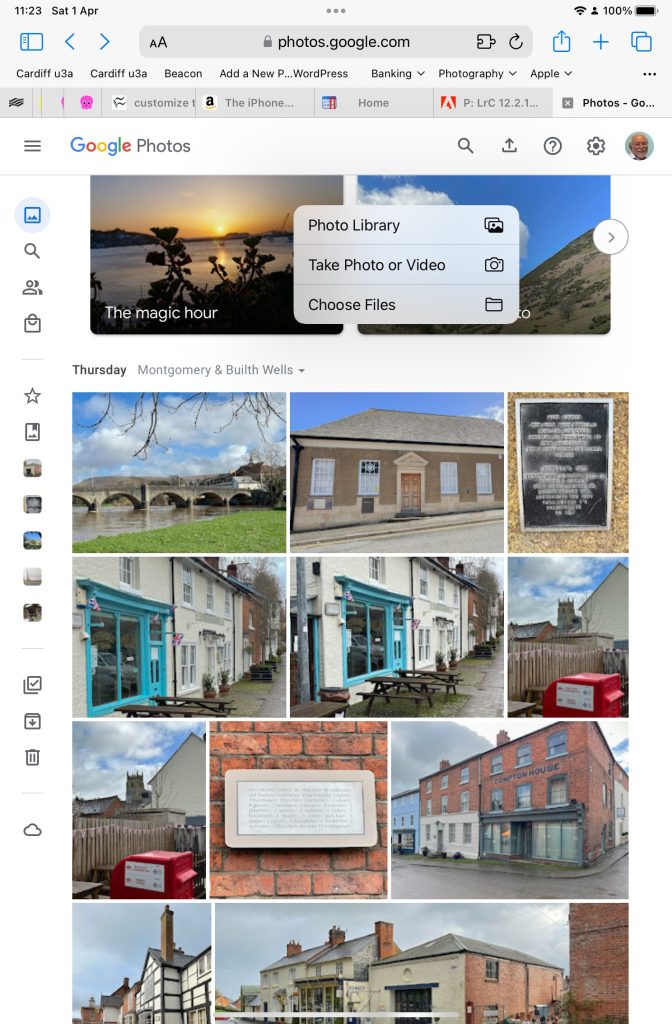
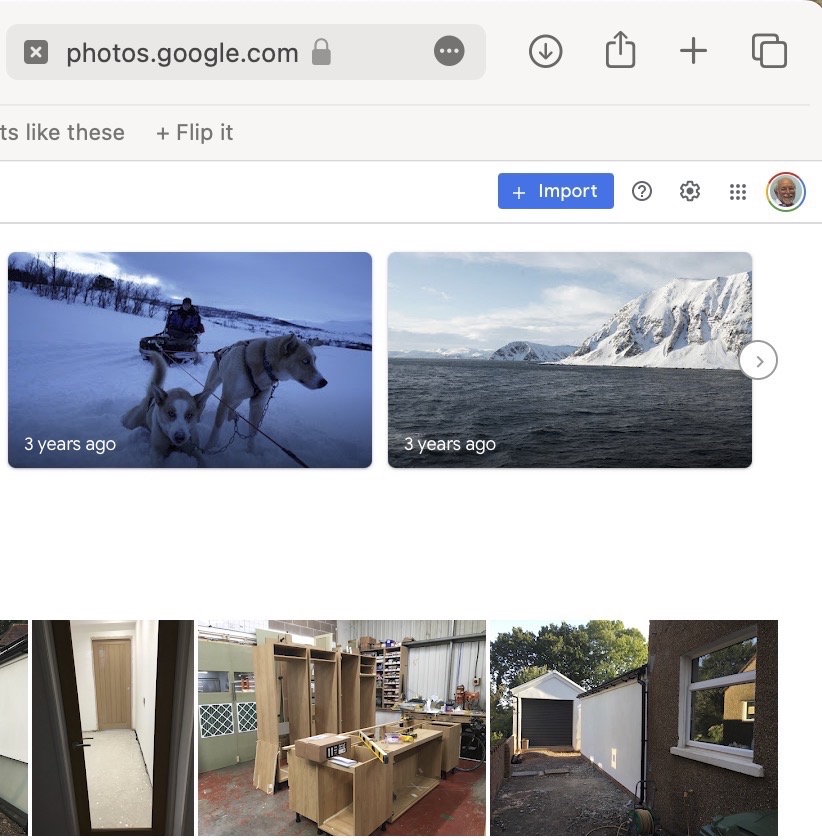
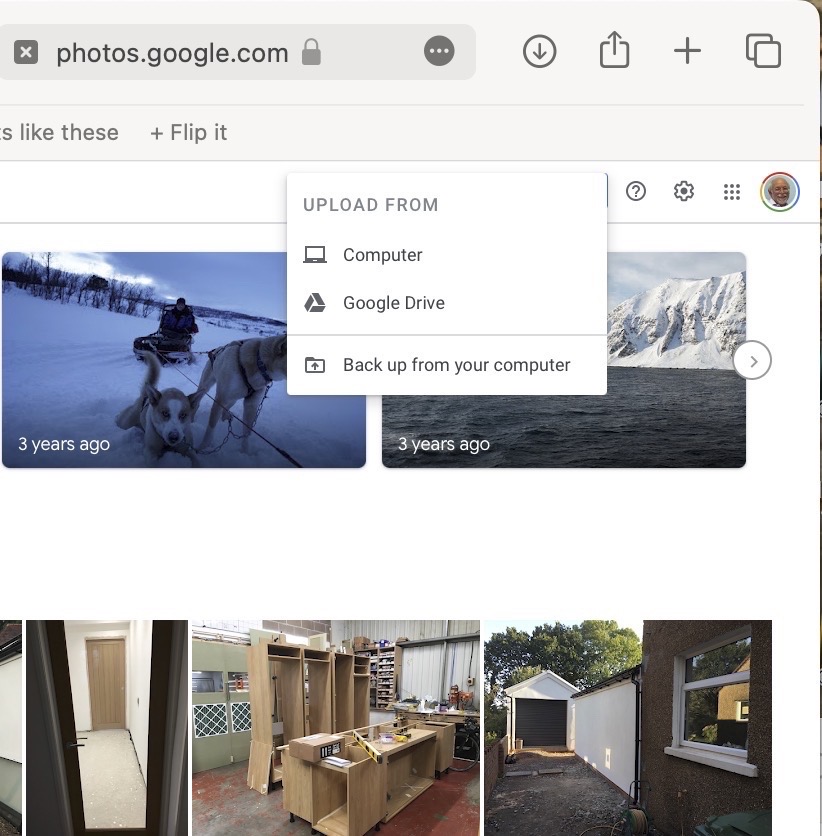
You can do the process in reverse. Go to photos.google.com and select Upload. You will be offered a variety of options …
An upload to photos.google.com from the Safari browser on my iPad
Choose (in this case) Tablet – as I was using my iPad to get the screenshots and you will get this dialogue …
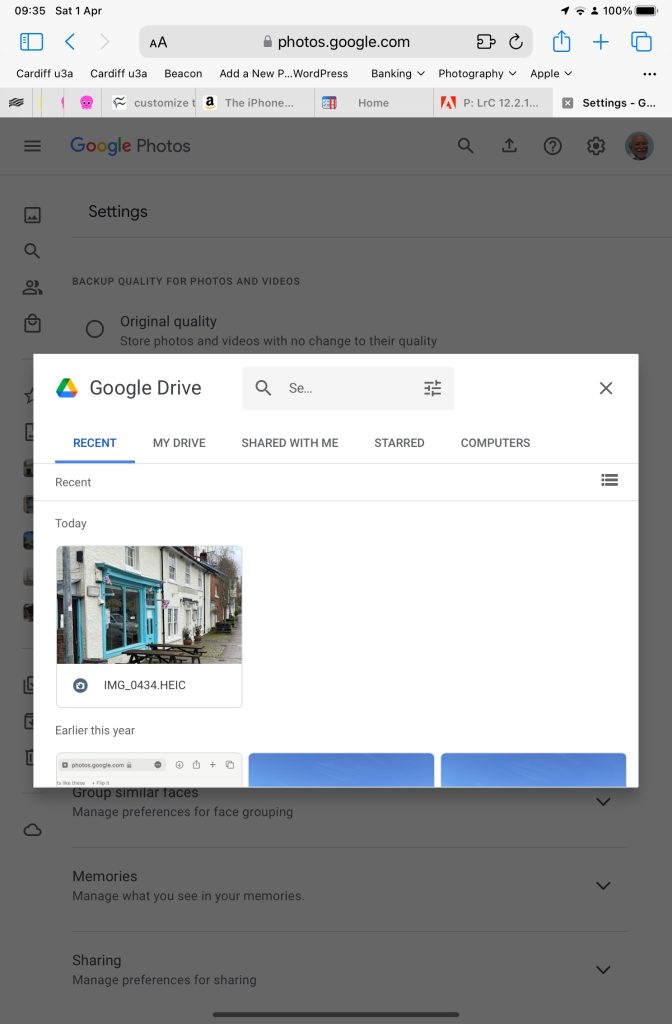
Choose Google Drive and you will get this dialogue …
Choosing an image you’ve uploaded to Google Drive
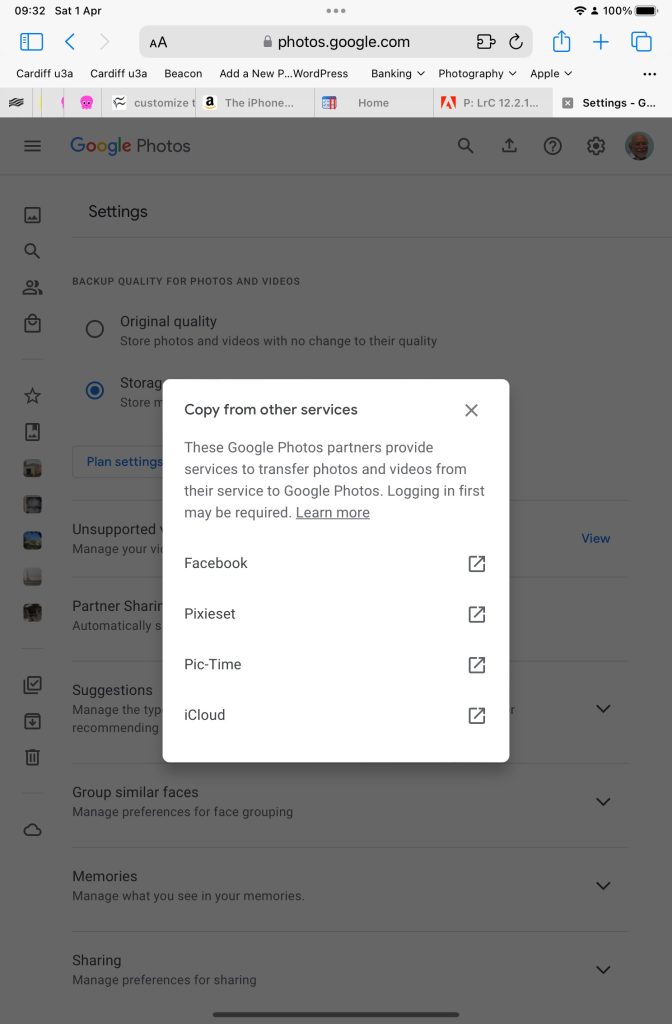
Choose Copy from other services and you will get these options …
From which you can see (something else that I’ve learnt), that you can copy from iCloud – where all my iPhone photos are backed-up – to Google Photos. Duh!!!
What a wonderful (and complicated) world Google Photos is, and think – this was just prompted by me seeing photos in the Google Photos app I knew I hadn’t “uploaded” to Google Photos. Rest assured, they’re just views into the Apple Photos Library, not copies!!!
Swinging in to early action after yesterday, I started the meeting with updates and news.
I asked if there were any questions follow-up to the Snapseed / Google Photos session and post – there are links in this to earlier posts on Google Photos and it’s my intention to check and update these (if necessary) as soon as possible. Ian raised an issue at this point about whether you can use Snapseed without the photos being on Google Photos. I hope I clarified that Snapseed is really only a smart device app, that it was possible to load it onto Windows and MacOS, but I wasn’t advocating it. If you’ve got an Android device, you will be editing an image already in Google Photos on your device – it may as well be sync’d to photos.google.com as well (I can’t check that). If you’ve got an iOS/iPadOS device you can load an image from the Apple Photos app (iOS) into Snapseed and then after edits – Export to Google Drive. The same is true for iPadOS. You can then from photos.google.com on your laptop/desktop Import photos from Google Drive into Google Photos which will then be viewable in the app on your device..
On a separate question Ian asked whether Google Photos and Apple Photos have duplicate images on an iPhone. I was pretty sure (and have just checked) that if you go into the Google Photos app and go to delete images, that the ones that will be deleted will be ones that are on iCloud (ie they are in Apple Photos). Google Photos on iOS only stores cached images from Google cloud storage. What is more if you look at Google Photos on your iOS AND iPadOS device (if you have both, and they have identical backup settings for Google Photos), the contents of Google Photos will be different, whilst those for Apple Photos will be the same. Thus I can say conclusively that they are not duplicated. The amount of storage used by Google Photos on your iOS/iPadOS device can be limited as is shown in these screenshots …
[NB I don’t advocate this as a method of deleting images from Apple iCloud storage]
… the images that will appear in the Google Photos app will be the ones in Apple Photos on your device. They will not be in Google cloud storage unless you a) have chosen to manually upload them (see above), or b) have switched-on back-up and sync – which for Apple users I don’t recommend as you’ll then have two copies of the image on both Google cloud storage and iCloud. I hope this clarifies things, you might also find this link of interest.
I then talked about the re-structuring of Forums and Topics on the website and showed where I’d put “The apps I use …”. I invited members to add apps they were interested in under the most appropriate Topic or Category within a Topic. I added that I would move contributions around if necessary, so no one should feel intimidated about adding their favourite app (or URL). I highlighted the recent Topic on VPNs in the Network issues > Internet security Forum.
Using the opportunity to discover further the resources on the website, I showed the Guides menu page, and displayed the PDF documents available on the page from BDM Publications. These are to be thought of as “try before you buy” only and I would refer you to the new publisher – Papercut Publications – to see the complete range of paper-based guides that you can buy.
Then I quickly ran through the latest additions to our Flipboard magazine, curated by Jonathan, Paul and myself. I highlighted the growth in interest in AI and ChatGPT in particular and indicated that I was going to use this as the basis for the next meeting, with the use of Passkeys and 2FA being handled in the following presentation-style meeting on 27th April. I did dwell upon the graphical representation of Pink Floyd’s most frequently paid songs, and that sparked some lively discussion.
Finally, in my “introduction” I requested members to look at the page for the Computer Group on the Cardiff U3A website and make suggestions as to changes and additions that could be made – Jim suggested adding some of the photos that he’d taken, which I’ll certainly take on board. I also reminded members of the deadline for reduced membership subscription (March 28th). This created quite a lot of discussion about the payment method and the interface with PayPal. Ted requested that anyone having difficulties could help the Committee by taking screen shots. I referred members to this page that Jim had posted on how to take screen prints. We also quickly looked at the notes from the last meeting and were pleased to record that Anne had resolved her problem with VirginMedia whereby Prime Video was not linking to her Panasonic TV – pressing Yes, when it should be No, is not intuitive, is it?
Matters raised by members followed.
John S commented that he was encountering more and more bad website design – we concurred with that; he was also having problem with streaming services fro Sky. This I felt (unlike the advice I’d given to John M at the previous meeting about buffering) was due to contention for shared bandwidth from the ISP. All you can do is to take repeated Speedtest readings (preferably from a laptop connected by ethernet cable to the router) at different times of the day to see just how much the speed falls from the contracted level they should be attempting to deliver. It will be rare that they can reliably offer what is declared to be a maximum, all the time, but the counterpoint is that they should be close to delivering that speed in non-peak times. It’s a matter for the ISP to resolve; not one to be passed onto OpenReach to raise a query.
Kate was delighted to be able to report that she’d done a seamless transfer of everything from an old iPhone to a new one. A good news story which I can support from my recent migration as well. Very easy and painless.
Don reported a strange problem with his printer which seemed not to be working from a cable (ethernet) connection after Win11 upgrade but which was working from WiFi (and his phone). I suggested that upgrading the Printer Driver might be a solution, but it’s difficult to diagnose remotely.
Ted requested (as mentioned above) that anyone having PayPal/U3A/subscription issues should try and take a screenshot and send it to him (or me, to send on to him).
John M asked what was incognito mode in a browser and how to get out of it. I said that was a very good question and would research and report back in the Forums.
Ralph had had a problem loading Google weather, but had solved it by stopping the download which had appeared to freeze (sic), and then re-starting it. I said I’d often experienced a similar occurrence when downloading from “live sites” – sites that were constantly changing, ones getting information from databases – and I usually just closed the Tab and then re-opened a new tab. This would clear the cache and start from scratch.
Anne was continuing her journey of discovery with Win11 (a not too pleasurable experience it would appear) and questioned where mail identified as Junk was going to, as it didn’t appear to be moving out of her Inbox. Jim felt this was probably a mail client issue, rather than Win11, but no one was able to definitively come up with an answer.
And with that rather unsatisfactory answer the meeting closed.
If you want to edit, even if only in a minor way, the photos on your smart device (phone or tablet, Android or Apple), two offerings from Google should be tried first. If you’re an Android (Google) device user, it’s a no-brainer.
The Google Photos app will be installed on your device when you get it, and all you need to do is install Snapseed from the Google Play store. If you’re an iOS or iPadOS (Apple) device user then there’s a couple of extra steps you need to do before you can get started.
This guide concentrates on Snapseed. I’ve written about Google Photos previously and I’m providing links to them below. I’ll check to see that things haven’t changed materially since I published these posts …
Although Snapseed is intended for use on smart mobile devices, you can install it on either a Windows PC or a Mac, but I have no experience of doing this, so it would be a project you would be taking on ahead of me. So for that reason I’m only looking at the app that you can download either from the Google Play, or Apple App stores.
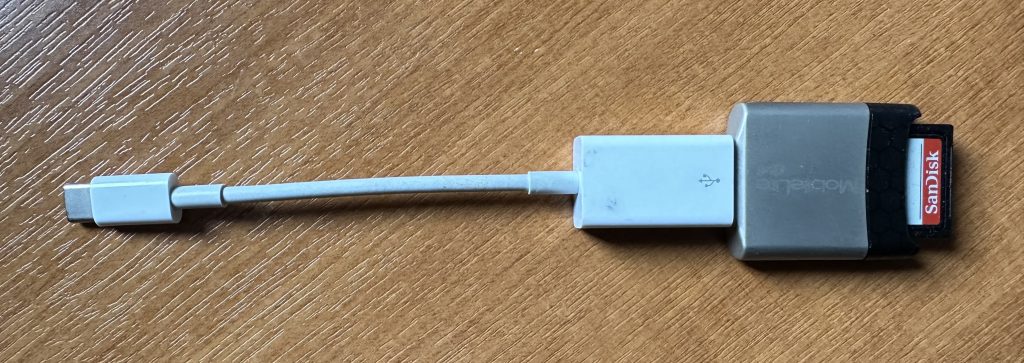
So for camera users (rather than smart phone users), you will first of all need to get the photos onto your device. This could be by a direct cable connection from your camera to your phone, or by transfer using Bluetooth or WiFi, but more likely might be by using a SD-card cable like this one I have for the Apple gear. [It will either have to have a Lightning or a USB-C connector – check first before buying one.]
Apple USB-C to USB-A connector with USB-A SD-Card slot
The image(s) thus transferred will be added to your photo library be it Google Photos, or Apple Photos. Another way of adding photos on your computer to your Google Photos would be an Upload to photos.google.com – you will need a Google account to do this. This is how you would do it …
Select Import to Upload images to Google PhotosSelect images from the Computer (or from Google Drive)
You could decide to use Google Backup to synchronise all your photos from your iPhone (or iPad) to Google Photos as an “easy” way of getting the photos on your Apple device into Google Photos, but this is not necessary to use Snapseed as it can access your Apple Photos directly; so I don’t because I’m already backing-up my photos to iCloud. [I only discovered in November I was also sync’ing to Google Photos, so I stopped doing that then and saved some Google Drive storage, and a whole lot of complications about knowing what was where.] But if you want to synchronise from your Apple Camera to Google, this is how you do it from the Google Photos app on your device …
Instructions on how to synchronise Photos on Apple devices to Google Photos
You should now install the Snapseed app on your device(s) from the Google Play, or Apple App stores, if you haven’t already. If you’re an Apple user you might choose to install the Google Photos app at the same time – although you don’t need it to use Snapseed, but you might just like to compare how it works.
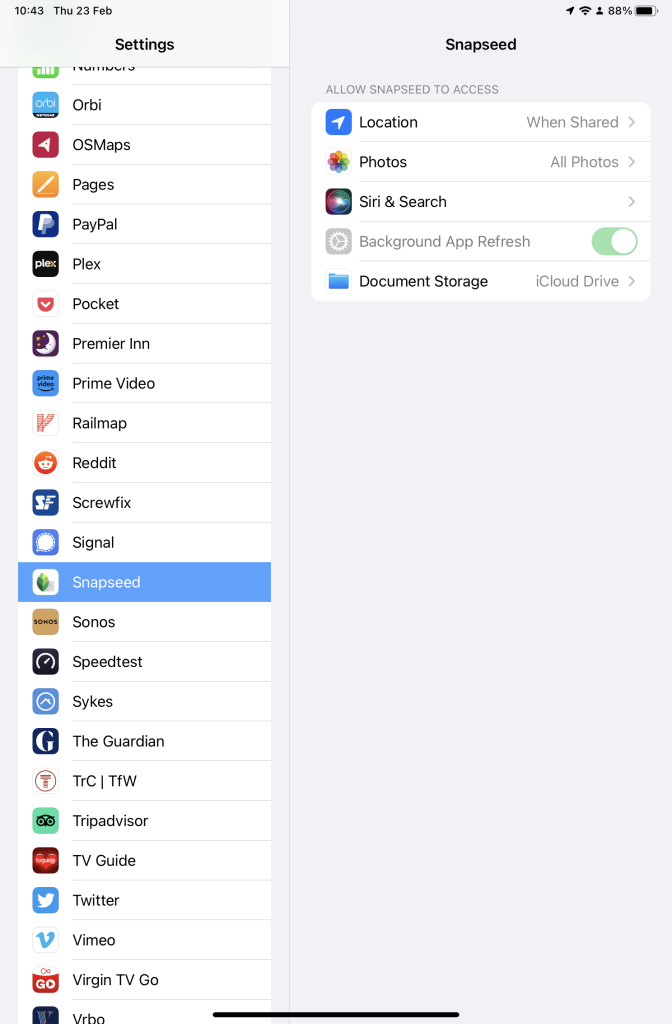
Next up, if you’re an Apple user you need to allow access to your Photo Library to Snapseed (and optionally Google Photos). This will allow both apps (on iOS) to access the Photos in your Camera Roll on your iPhone or iPad.
Setting up Google Photos and Snapseed to be able to look at Apple Photos on device(s)
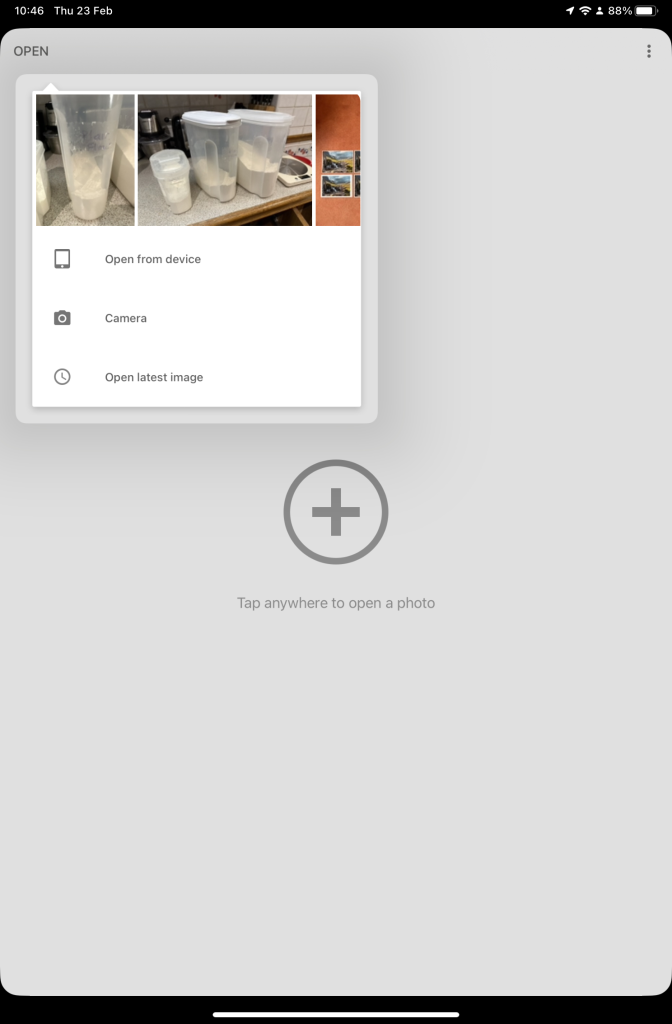
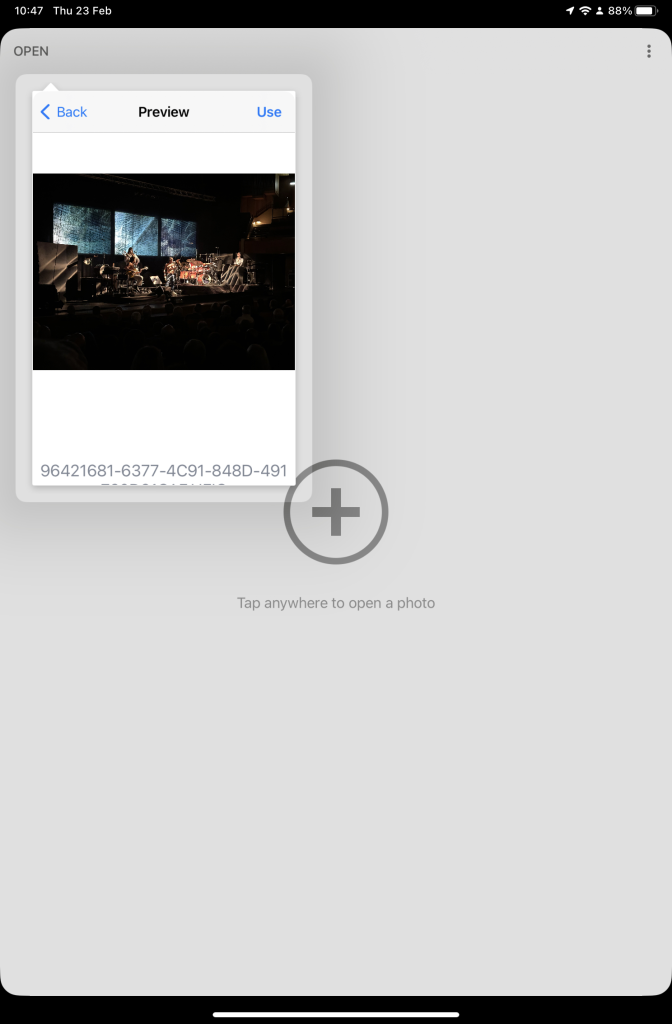
So now your ready to start editing. Open the Snapseed app on your device – you are prompted to Open from device (ie look at the images in your Photo Library), or you can access the camera to take a shot, or Open latest image that you’ve taken. The steps from then on are relatively straightforward and you will have selected the image that you want to Use.
Open Snapseed and look at the photos on your local deviceSelect an image to edit, and click-on Use… and so start editing.
That’s about it. This video (recorded from my screen, hence background noise and rather low audio volume) gives a reasonable introduction on how the Snapseed app works …
A brief (14mins) introduction to editing photos using Snapseed
Here are some links that you might find of interest:
Using your Android camera to take photos; but I believe all Android phones have slightly different camera interfaces, so you’re better off researching that for yourself. [NB If you have come across a really good guide, let me know and I’ll add it to the list here.]
This article is prompted by a combination of a casual enquiry about sending photos from your iPhone to Google Photos (hosted on a Google Drive), and my own discovery that I was backing-up iPhone photos to BOTH iCloud and Google Photos.
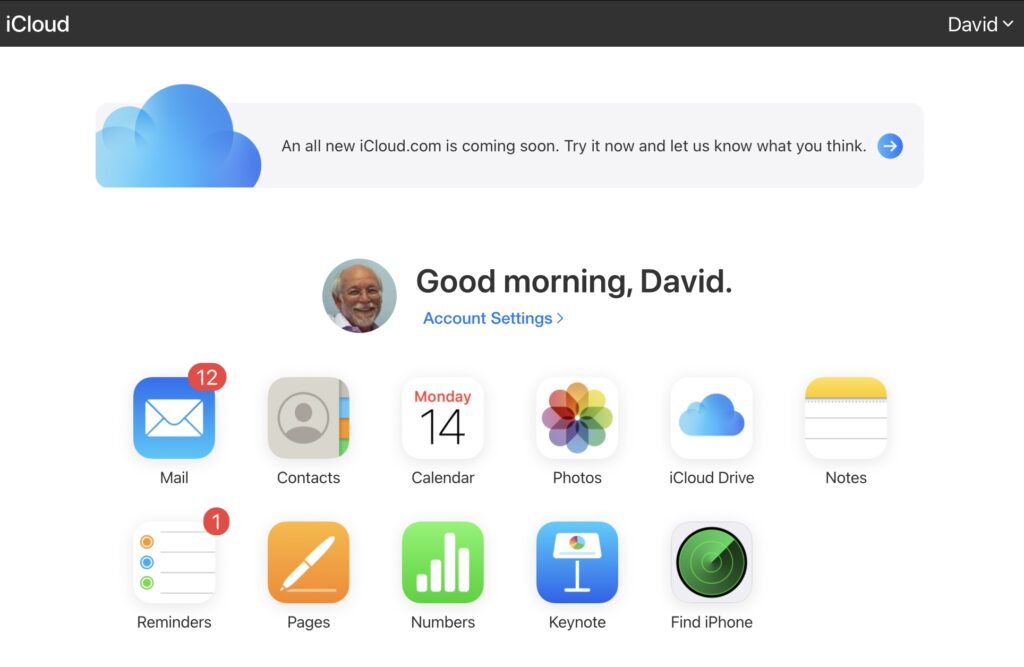
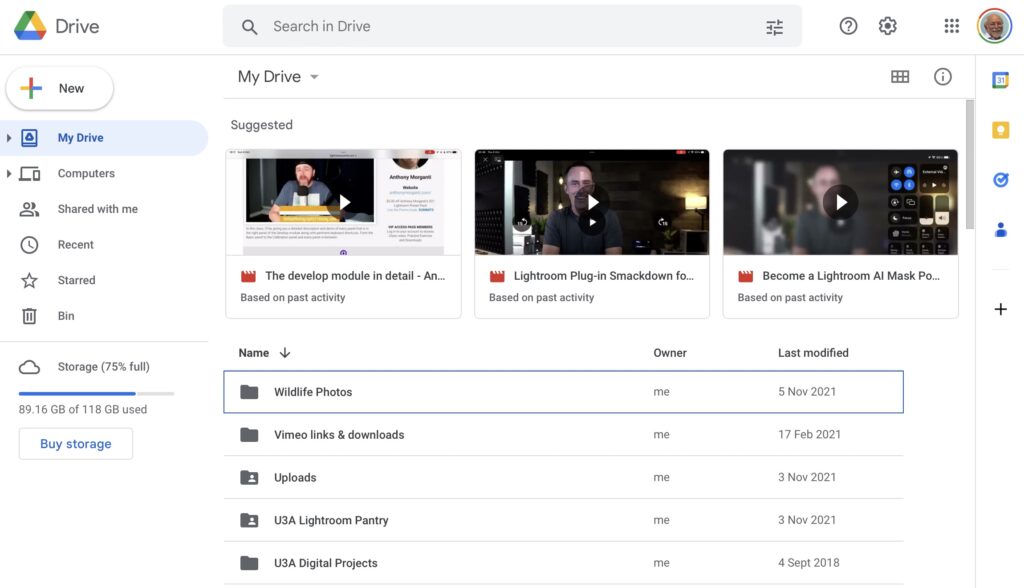
Observation one. Google Photos and iCloud Photos don’t work in quite the same way. Whereas you can access the Photos you may have stored on Apple’s iCloud storage from icloud.com through the iCloud Photos app, you cannot access Google Photos from drive.google.com directly – you have to go to photos.google.com to access them. Google Photos uses up some of your Google Drive storage – you get 15Gb “for free” with a Google account – but it’s a standalone application, in the same way as Google Mail is. It’s an important distinction. Google provides you with applications which make use of their cloud storage, Apple provides cloud storage alongside access to applications which use that storage and which synchronises back to devices.
The iCloud window {Access to all Apple applications and cloud storage}
The Google Drive window {NB No access to Photos, or Mail}
The Google Photos window {separate from Google Drive}
Observation Two. This article concentrates principally on Google and Apple, because they are the two principal players in the Camera and Cloud Storage space. There are other cloud storage solutions on which you can store photos, eg Microsoft’s OneDrive, and Dropbox. I will only refer to these briefly at the end of this article. There are undoubtedly other cloud storage solutions, but I won’t be writing about them.
Observation Three. Anything I write about the link between Camera and Photos on an Android/Google system is second-hand knowledge, and I cannot verify it!
Observation Four – the final one. This article does not seek to cover the general topic of transferring photos from a phone to your computer. This is more than adequately covered in this article. I suggest you read it too.
Not wishing to be dismissive, but just because it’s so straightforward – I’m going to discuss Google Photos first. If you have an Android phone and thereby have a Google account, you automatically have 15Gb of cloud storage and the two are linked, and by default any photos you take on your phone are backed-up to your Google account. This is described well in the Google Support article. A couple of things are worth highlighting however: a) you can switch-off automatic back-up and synchronisation of your photos, in which case all backups would need to be done manually; b) you should carefully choose the “quality” of the photos you back-up – they may not be the same as that of the photo on your device; and c) it would appear that you could backup photos to a different account from your main one, thus adding to the free 15Gb you get with each account. [Alternatively, for £15.99 a year you could get an additional 100Gb of storage from Google. If you aren’t an Apple user this is definitely worth considering.]
It’s not that much more difficult if you want to save photos from your iOS (iPhone or iPad) device to the Google cloud storage. Again the Google Support article describes the process and the options quite well.
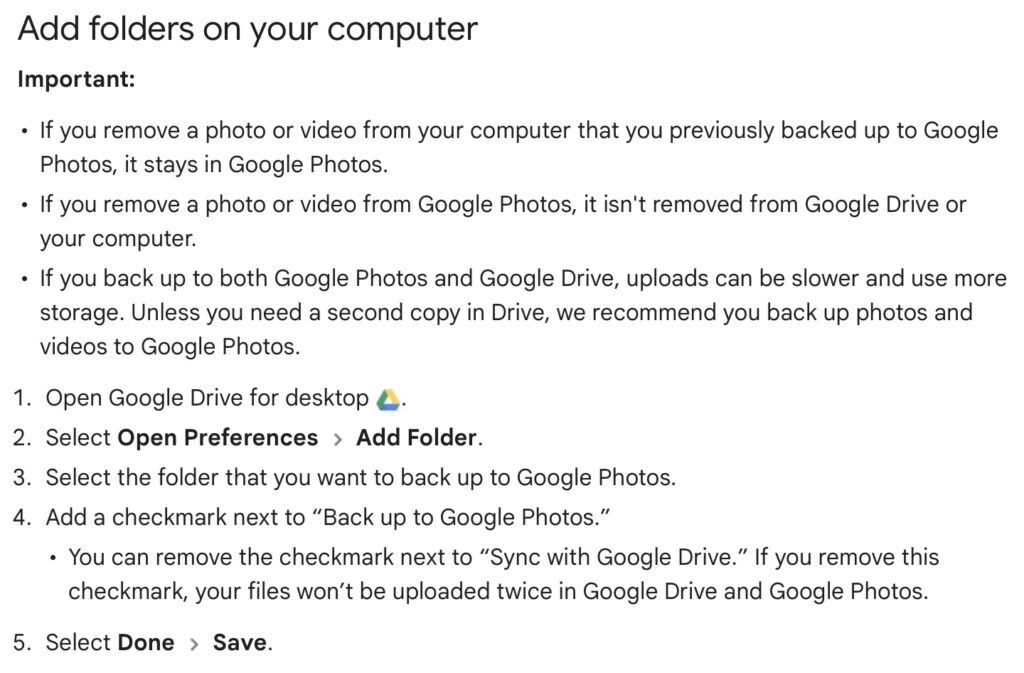
Similarly if you’ve transferred photos to your computer (eg from a camera SD-card), then Google’s got you covered to back-up and sync to their Cloud storage in this article. You should nominate a folder on your computer that Google Drive will monitor for newly added files which will then be backed-up and synced to either Google Drive, or to Google Photos, or both, depending upon the option(s) you’ve chosen.
Note (4) – you might get two copies if you don’t uncheck “Sync with Google Drive”
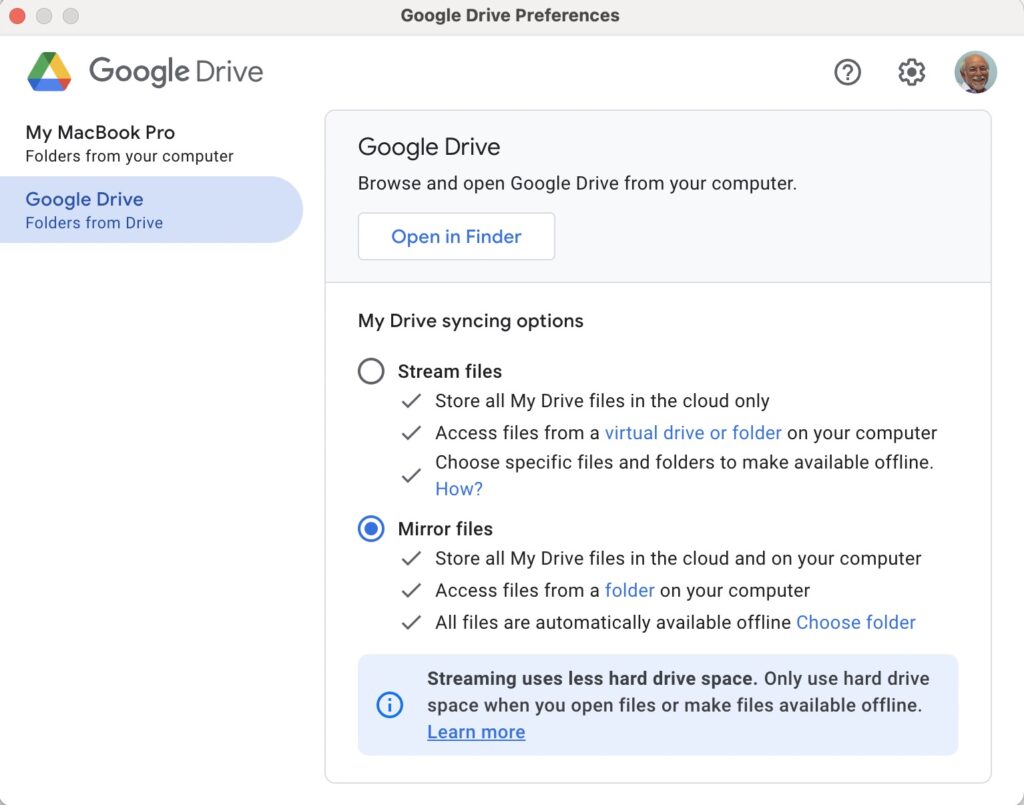
For this to work however, you do need to be sure you’ve a) installed the Google Drive on your computer, and b) you’ve set the preferences the way you want them. In my case, since I’ve increased the amount of Google storage I have, I’ve chosen to Mirror a folder (in itself called Google Drive) – then both the folder on the computer, and the one in the cloud should be exactly the same. A mirror in fact. Anything I add to (or edit on) my local Google Drive will be copied to my Google Drive in the cloud.
So we turn next to the Apple ecosystem. [I should feel more confident here, but as you may have noted that I disclosed at the start of this article that I was doing something extremely stupid and not noticing my idiocy.] Here the support page on Apple Photos and iCloud I think really does a good job of explaining your choices and how to set up backup to their cloud storage. I don’t think I can improve on it. But what if you’ve got Google Photos installed as well on your iOS device? This is where I made my foolish mistake. I enabled Backup and Sync on my iPhone and so I got TWO copies of every photo – one in my Google storage in Google Photos and the other in my iCloud storage. Duh!!!
Disabling the Backup and Sync left me with an image which was shared locally between the Google Photos and Apple Photos apps. How could I get that image (or group of images) onto Google Photos to perhaps share with friends or family?
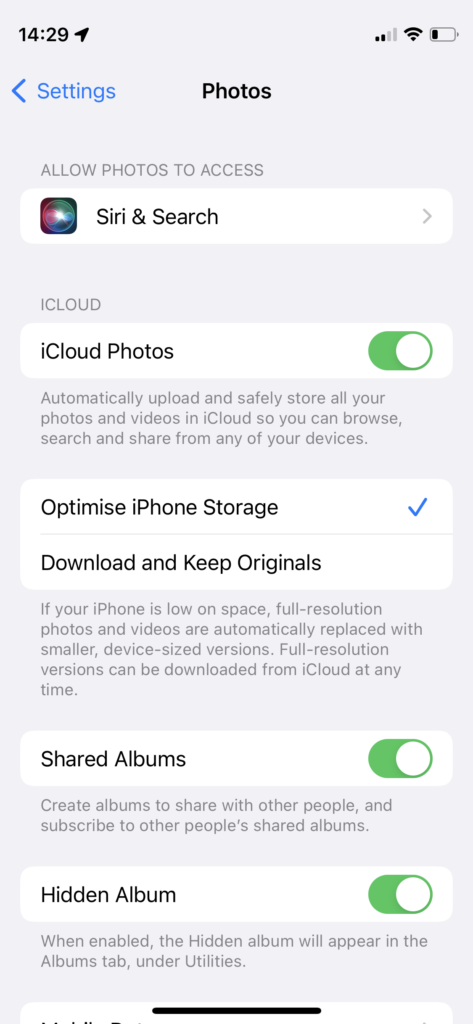
It turns out that there are two reasonably easy ways of doing this. By enabling iCloud Photos on the phone (or tablet) …
Set iCloud Photos to On
… I can then download from iCloud to a folder on my computer which I can then upload to Google Photos from. Really rather simple and not a use case for Google Photos Backup and Sync to be employed.
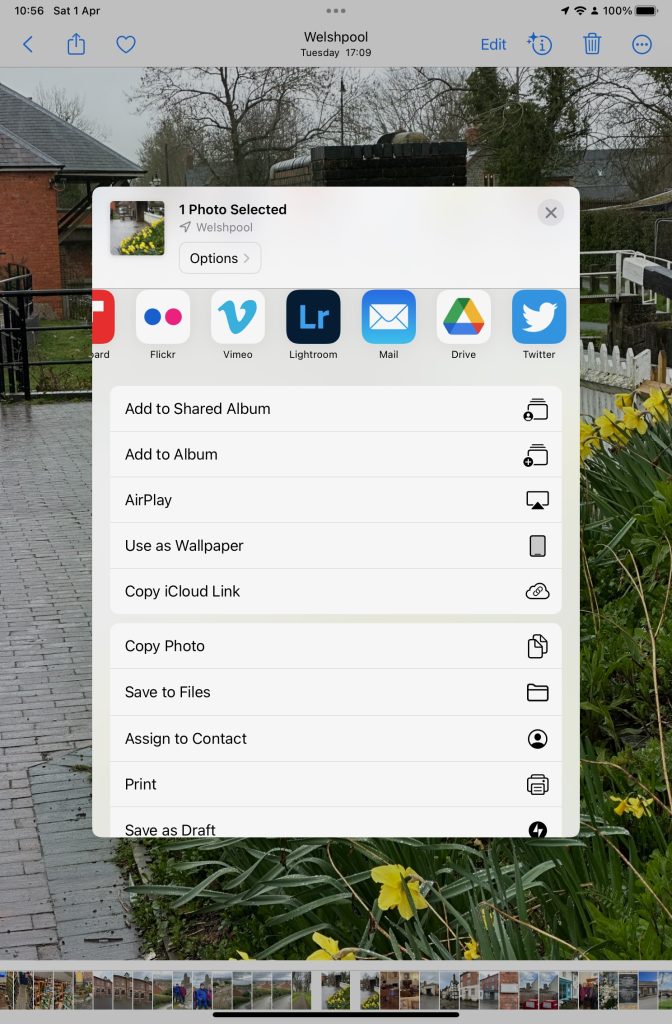
Alternatively, I could go into the Google Photos app, select the image I want to send to Google Photos in the cloud and Share it by getting a link and then sending myself a message. The act of sharing it copies the image to the cloud, from which I can then add it albums, etc.
Using either of these approaches allows you then to obtain a link for the album which you can then Share to a list of users, or obtain a link for public sharing.
Once you get the photos onto Google Photos the fun starts. It’s not intuitive what happens when you decide you want to delete them either from the cloud, or from your device. In fact it’s downright confusing. I’ve written about this in another place (the public Thought grazing) and life is too short to repeat anything on here that I’ve already written over there, and believe still to be correct. Best of luck!!!
The situation with deleting photos from Apple Photos and iCloud Photos is slightly more straightforward and I’ve written this up already, so won’t repeat it.
It goes without saying that keeping it all in the Apple ecosystem (for me) makes a lot of sense, and with the ability to share albums on the way – it’s not yet as sophisticated as the Google Photo Albums service – I may transition away from Google Photos altogether in time.
For Dropbox users, you can setup an automatic upload of photos to the service. They even give you a bit more free storage if you enable this, or at least they used to!
The seed for this topic was sown by Ian at our meeting on October 13th 2022. I had to admit that although I had a reasonable idea of what happened with Google Photos, I was unsure what happened with Apple’s cloud offering.
I was reasonable quick in advising (and it’s reported in the notes of the meeting), that as expected …
“I can confirm that deleting a file on iCloud Drive from the Files app on an iPhone will delete it from icloud.com and your iCloud drive on MacOS as well – which is what you would expect should happen.”
However, the situation of Photos stored in the Apple Photos app (on iPhone or iPad) and iCloud Photos should also be noted – for completeness.
I’m not going to write anything; just provide three links to follow to clarify …
If you want to delete a Photo from both device and iCloud Photos. Just ensure Sync is left on and then you can delete the image from either the device or icloud.com
Having confirmed all this, and having more storage space on iCloud, and understanding that sharing Photo Albums is about to come to Apple Photos, and having checked that Sync’ing does seem to be working for iCloud Photos (from my Apple devices), I checked my Google Photos settings settings and switched-off Back up and Sync. I was doing far too many cloud backups!!! Always worth checking. If I want a Photo to be on Google Photos (for sharing for instance), I will now Upload, not rely on syncing.
First off can I thank Sianed for taking over the meeting for the “round the screen” session which enabled me to take notes and have the fun of “lifting my hand” to speak.
There was not much to report back on from the previous meeting. I mentioned that I’d come to a determination that all media and messages in WhatsApp (and Signal) was held on the phone that was registered to WhatsApp (or Signal); the images on the desktop (and the iPad for Signal) were synced to the phone. This it was agreed could cause some phones to easily run out of memory.
As far as News was concerned there were just a couple of items that I’d already added to the Flipboard magazine – one on moving chat histories from an Android phone to an iPhone, and another about new features that were to be added to Apple’s Homekit (for developers), which we might find some use of in our use of Smart devices in the future. [NB We need to give this area much more attention and look at the Smart home more.]
I then thanked everyone who’d replied to the survey about a future venue for our face-to-face meetings. Not unexpectedly, nothing came out as a definite area of agreement for everyone, but some things did come through – no preference for room layout; a desire for a bit of social distancing (and good ventilation) from a couple of members; and no real need for catering. Taking these into consideration, it appeared to me that if we could return to URC that would be a good solution – probably using the Upper Room (rather than Meeting Room 1). I suggested that the meeting after next we should meet at URC and try the venue out – so that’s where we’ll meet on 21st July, our last meeting of the year. [Subsequently, I’ve re-visited URC, have been impressed that they have a new projector system for the Upper Room and I’m now working with them (Bob) to perhaps enhance the WiFi system which they badly want to improve themselves. Watch this space!
We then had a very short break and Sianed took over!
Paul returned to the issue he’d been having with Resources and Chrome; in discussion with Ted it became apparent that there was a need for a comprehensive article on where videos were stored in WhatsApp and I undertook to write such a post. [Following the meeting I did post a few links on Signal, which might be useful in the meantime.]
David reported that his screen sharing from his iPad to the TV was now working well for his Bridge-playing Tutorials [a link to this is on Signal – thanks David].
Ralph thanked Paul for the advice he’d given on driving licence renewal.
Steve recommended investigating the use of iCloud – it’s not very expensive to get 50Gb of cloud storage – if you’re an Apple user.
Christine reported that after a bit of a quiet period, the scams had started again and she’d had ones from Amazon and Paypal [I would recommend everyone consider subscribing to the Which Scam Alert Service] and perhaps one from Welsh Water, but there was some discussion over whether this was the Priority Registration Service – which is worth joining in case there’s a disruption in water supply, or indeed joining the similar registers for our utilities. [We’ve done this.]
Fred had gone to the recent General meeting (Roald Dahl) and learnt a few things, and had also renewed his driving licence following Paul’s advice.
Jim was still not sure about where WhatsApp/Signal stored images etc. and reserved the right to comment later, following my investigations.
Renee reported that the online portal for registering a change in marital status was a nightmare. No further comment – we suspected that very few (if any) of us were likely to be needing to use that portal 🙂
Ann had got into a pickle with downloading photos to her Google account that had then filled up her allotted storage and mail had stopped working. I sent a few links (on Signal) to help her work this one out but again promised to wrire n article on that as soon as possible.
I had nothing to report – I’d been too busy in the garden!
I then gave a brief review on the internet browser and search engine markets, the links I used are on Flipboard, but I will try and write an article about this too.
Just like me, Sianed didn’t report on anything – something I too often forgot to do.
That’s about it. A couple of articles for me to write which I’ll try and do as soon as I can.
Our next meeting will be on July 7th which will be an outdoor social meeting at The Castle Coffee bar, where we met before. Pleas try and come along if you can.
Finally, you’ll remember that I left the WhatsApp group and left Jim as the Admin. I asked him last week whether there had been any relevant activity on it. He reported that there had not. Therefore we agreed that he should close it, and that he’ll do shortly. Anyone not using Signal, I strongly encourage you to download the app and start using it. Let me know and I’ll add you to the Computer Group group on Signal.
Barbara asked a question about Google Photos, and I’ve re-visited the articles that I wrote a couple of years back, updated them to be relevant (I hope) – but I can’t be certain all the screen shots are the same as the present Google Photos on the web – and present them here for you to look at; if you’re interested.
First an article on “Getting to grips with Google Photos“, which basically tells you how to get your photos into Google Photos so that you can edit them online using the editor that’s available in Google Photos on the web. It might also be useful to bear in mind the article I wrote today on “How to delete photos from Google Photos“to get an understanding of how Google Photos actually works.
Then an article on “Simple Image Manipulation“, which introduces you to the online Google Photos Editor.