We had the pleasure of a presentation on Linux, Raspberry Pi, VPNs, KODI and Geolocation from Dave Williams (our American cousin). Here is the outline of the talk he gave us. I should have recorded it – an oversight!
X86 LINUX
* Define OS
* Interface between the “guts” and apps
* Linux was developed by Linus Torvalds as a college project
* FOSS (free and open source)
* Many distros, I used Red Hat, SUSE in past.
* Ubuntu (Zulu for humanity toward others). Provides a good selection of apps.
* Xubuntu good for older machines
* More secure from malware than windows, I zealously update and I’ve never had a problem
* War stores. No longer so nerd-centric. Apps easy to install with APT and SNAP.
* Unless your name is Harrison don’t dual boot! Install on that old PC in the basement.
* David and Paul dog and pony show
* https://fullcirclemagazine.org/
* https://www.youtube.com/watch?v=D4WyNjt_hbQ
RASPBERRY PI SBC
* Single Board Computer, ARM architecture like phones
* Raspberry Pi is a type of SBC, developed to teach kids to code
* Became popular with computer enthusiasts for projects (eg robotics)
* HTPC limited to two channels
* I use a version of Ubuntu developed for Raspberry Pi
* https://ubuntu.com/download/raspberry-pi
* https://magpi.raspberrypi.com/
VPN
* Virtual Private Network, I use NordVpn
* I always use for bootleg
* Geo Location
* Easiest way is to use as browser extension
* https://www.tomsguide.com/best-picks/best-vpn
KODI
* Can be used to hack media
* Requires add-ons
* Real Debrid to access restricted media $17 USD 180 days
* Watch in real time or download
* Security concern with Raspberry Pi
* https://troypoint.com/best-kodi-addons/
Geolocate
* Requires VPN, easily applied through browser extensions
* CBC (Canada)
* SBS on demand (Australia)
* I suggest creating a ‘throwaway” email address
* create an account
* log in
The talk led to a lively discussion with many interruptions from yours truly. We then were able to examine the Raspberry Pi that Dave had brought with him, and the three machines running Linux (Ubuntu) that Phil and I had brought along. Two of my machines were “new” in 2008, one of which has still a functioning battery. That’s quite some achievement for a laptop and to see them running up-to-date software – eg LibreOffice, Firefox, Brave and Thunderbird is testament to the usefulness in prolonging the life of old machines. One of my laptops was running Windows XP in dual-boot mode – again an indication that if you’re careful with your internet activity, old machines are not necessarily redundant.
Not a Spielberg masterpiece but something I knocked up this morning. There is one mistake in it, corrected in the second-half of the video. The Mac requires a 64-bit Linux distro, not a 32-bit one, so the same .iso file I used for the Dell Inspiron was used in trialling Ubuntu 20.0.4 on the 2008 MacBook Pro.
How I built a Ubuntu Linux 20.0.4 system on an iMac and tested it on an old MacBook Pro
I’ve also discovered that Etcher is available for Windows as well – go to pull-down button on this page. It might be worth looking at this as an alternative to Rufus.
It is a dual-boot system. It has both Windows and Linux Ubuntu installed on it. When I turn it on, it asks me at boot-up, whether I want to use Windows or Ubuntu. I hardly ever use Windows because I find Ubuntu so much better. However, for this, I’m using Windows because I know that most of the afternoon Zoom group use Windows. I’m using Windows this afternoon so I can see how the Windows installation of Linux works.
Windows is horrible.
So far I’ve had five pop-ups and two programs starting without me wanting them to start. Added to that, with Windows, this laptop takes ages to start.
You don’t get those sort of problems with Linux.
You will also not need anti-virus software as Linux doesn’t appear to get viruses.
Now, you might be interested in taking a look at Linux from a purely academic standpoint; something new to learn during lockdown.
OR … you might have an old computer lying around; one that you’d like to drag back from the grave.
So let’s get started
Linux is an operating system. Windows and MacOS are also operating systems. An operating system is the program that actually makes your computer work.
To proceed, you’ll need to do the following … and it would be best if you did this before next Thursday’s meeting because some of the processes take a bit of time, otherwise you’ll just have to accept being an observer.
Take a look at the computer that you’ll be trying to revive – but remember you can run Linux from the USB drive without making changes to your computer, so it could be any machine. Make sure it has a USB drive. You’ll need an empty USB pen drive doohicky, at least 4Gb in size. Also, the computer that you intend targetting, it would be best to be a 64-bit system. Google your computer’s make and model to find out whether it is 64-bit.
This is for Ubuntu Linux 20.04 LTS. LTS (Long-term support) means that the software will be supported for 5 years. A new version of Ubuntu comes out every April and every two years you have a new LTS release. This page also tells you the minimum requirements that you need on your computer for Ubuntu to run well. Incidentally Ubuntu is a South African enterprise. It is totally free to download, install and use. In fact, everything in the Linux world is totally free. Linux comes in many different flavours e.g. Mint, Red Hat, Fedora … you chose the flavour that best suits your needs. My opinion; they are all very similar. Ubuntu is probably the easiest to get to know and with the best support. It will take a while to download as it is a big file … about one hour in my house but I have Virgin cable.
If you only have a 32-bit system there is another Linux operating system that works well on older 32-bit computers. It is called Bodhi Linux. Download the image file here. https://www.bodhilinux.com/download/ download the legacy version.
Once Ubuntu has finished downloading, don’t do anything with it. Don’t double click on it or try to get it to run. Just make a note of where you’ve stored it.
Now, you can’t just put the file that you’ve downloaded onto your USB drive. It is just a bit more tricky than that. You’ll need one more piece of software. It will transfer the Ubuntu file you’ve downloaded onto your USB drive and create a bootable disk image. These pages will give you a run down on what to do next on a Windows computer.
You will need a piece of software called Rufus (free, open-source) to create the bootable disk image. Here’s the link to get it.
You should Download AND install Rufus 3.11 1.1Mb onto your machine.
Now, on Thursday afternoon, in order to proceed, you will need the Ubuntu file stored in your computer and have Rufus downloaded and installed. We’ll talk you through the rest of the procedure over Zoom but rest assured, you’ve already done an awful lot.
Please note. All the above assumes you will be working on the target machine; BUT you could prepare the USB pen drive on one machine and then apply it to another. For instance David prepared his Ubuntu installs on a Mac, with the intention of targeting an old Windows machine. It’s just important to know what your target machine is, that it’s 32-bit, or preferably 64-bit.
Things you need to understand.
Once you have Ubuntu on your USB pen drive you can:-
Run Ubuntu on your computer just to see what it is like. This won’t make any changes to your computer. After you’ve taken a look around the system you can just shut down, pull out the USB drive and re-start. All will be just as it was before.
Make a full Ubuntu install. This will completely change your computer to a Ubuntu device. There will be no turning back from this option. However, you will have use of all of the space on the hard-drive.
You can choose a dual-boot installation. This will partition your drive into two sections. You can keep Windows on one section and Install Ubuntu on the other. Although this sounds complicated, it really isn’t … you just need to make a choice on the size of the partitions that you’ll need. If you chose this, every time the computer starts you’ll be asked whether you want to start Windows or Ubuntu.
Other things to consider.
You can get Windows programs to run on a Linux machine but this is a bit of a black art and beyond the scope of this project.
However, Ubuntu comes with quite a few pieces of software pre-installed including Libre Office. This is very similar to Microsoft Office. You should know though that when you create a document in Libre Office, you can choose to save it in Microsoft Office format and a Windows computer will be able to read the document. Similarly Libre Office will open Microsoft Office files seamlessly.
One of the pre-installed programs is called Synaptic. This is a bit like the app store on many mobile phones. You can find oodles of pieces of software within Synaptic, all totally free.
One last thing to consider.
Both myself and David have successfully undertaken these procedures and everything worked just fine. However, please realise that if anything does go wrong then you really should be prepared to take the responsibility yourself. We can’t really be held responsible for the vagaries of a variety of computer systems. However, usually just preparing the Disk Image on the USB stick and trying again is usually quite successful. All I can say is that many people have installed Ubuntu. I’ve just checked the website to find out how many Ubuntu users there are. It was quite refreshing to learn that Canonical; Ubuntu’s parent company do not harvest that sort of data. A rough estimate is that 1-2% of all of the computers in use world wide use some sort of Linux installation.
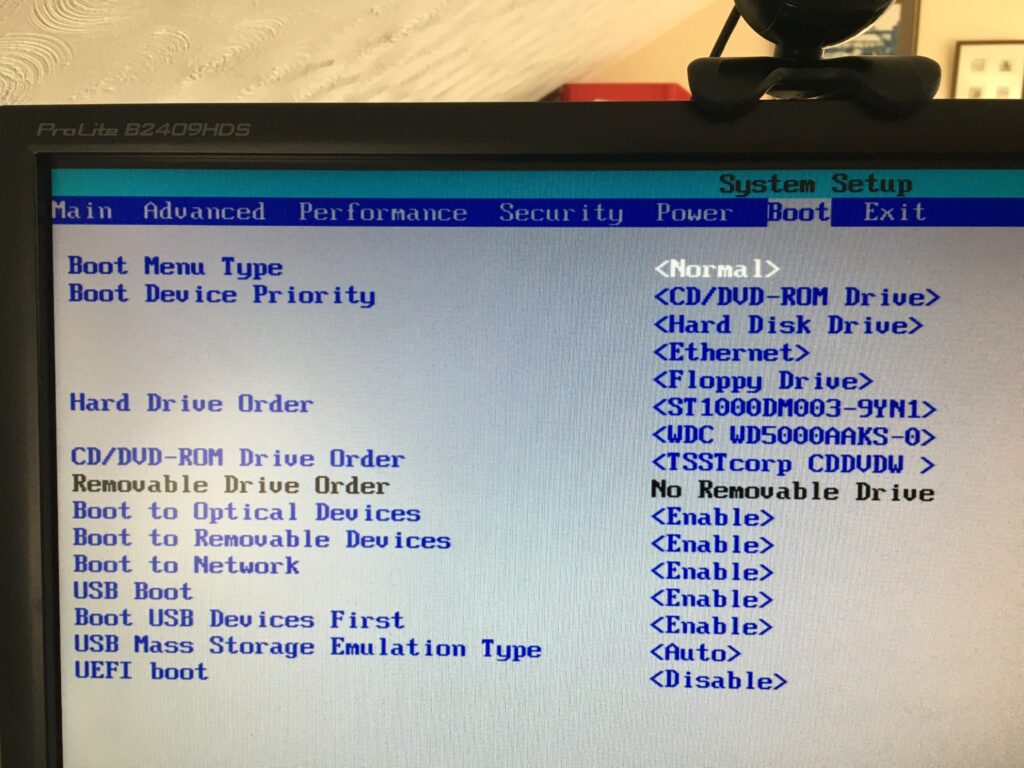
Addendum. A note on Boot Order for PC-folk and your BIOS
You’ve got your USB install drive; you’ve got a PC; the only “tricky” bit left for you is to change the boot order of your PC. By default the machine will look to boot from an internal hard drive, but it doesn’t have to. You want it to start from your USB drive. So read this to see how to change the boot order.
If there’s no bootable USB drive in your machine it doesn’t matter; the boot sequence just looks for the next drive it could boot from – usually the internal hard drive. That’s why on some BIOS you’ll see the CD/DVD drive as first in the list as that’s where (traditionally) you would have installed/upgraded your Windows from – before the internet! Before that it was the floppy drive (a: or b:) – remember that; and that explains why the late-comer the hard-drive is always labelled c: or later, d: etc.
Of course on the Mac, it’s much easier , you just have to keep the Alt/Opt depressed as you boot-up and then select the boot device 😉
Second Addendum. Having problem with Booting your USB disk?
You should look at these settings in your BIOS on a PC. Often the key to press when you want to access BIOS settings is F2.
Getting the Boot order correct, and making sure that USB Boot is enabled.
From the BIOS settings menu just make sure that Boot USB Devices First is enabled. If you have the USB Device inserted, it will also appear in this list. You could move it to the top of the list, but of course it will disappear from this list when you take it out – that’s why Boot USB Devices First is important. You could also Disable the Boot to Network option.
Making sure you can Boot from your USB device
From the same F2 BIOS Settings menu you should make sure that F10 is enabled (or whatever key is designated to Enter Boot Menu) and F12 is disabled as you don’t want to boot from the Network at this time. [You can always enable it at a later date, in the unlikely event this ever becomes a requirement.]