This could be a long post as I record my “adventures” into re-building my Viglen Genie 920 Tower system as a Linux Server running Ubuntu 20.04. Along the way I’ll also describe how I refashioned an old Dell Inspiron 1545 laptop into a Ubuntu machine looking as if it was running MacOS, as well as showing how even a small msi Wind notebook can be re-born with a change from WinXP to Ubuntu. That’s the design brief.
I’ll describe what I did with the three systems separately, although I did a lot of this concurrently.
The Dell Inspiron 1545
I found that the Dell Inspiron 1545 had a 64-bit architecture (but was it a 64-bit processor), it had 3Gb RAM installed and was running Windows Vista – it was a good candidate for a Linux installation and re-birth as a usable system.
Before I started I did a flash upgrade of the BIOS as I was unsure whether I could still do that after I’d removed the Windows Vista from the machine. I then created Bootable installers using balenaEtcher to create disk images on the iMac, a great piece of software, and produced a number of bootable USB LiveDisk images so that I could trial varieties of Ubuntu without installing them on the Windows Vista machine. I found this article – which Ubuntu to install – very useful, and following reading it decided I’d try Mate and Budgie. I didn’t like Budgie – too flash; but then (having determined that the laptop indeed had a 64-bit processor) went on to create a 64-bit disk image of Gnome with Ubuntu 20.04 which loads on the machine but I’m concerned that it may not be very responsive, so am thinking I may revert to an earlier (i386) version (16.04) of Ubuntu, once this exercise has finished.
There are a number of articles written on making Ubuntu desktop look like a Mac – I will try this approach first, and then this one – “How to make Ubuntu look like Mac”, and add a Taskbar using Plank. [Links to be inserted]
I also shelled out £16.50 for a replacement for the 1Gb RAM in one slot to upgrade the RAM to 4Gb …


and I was amazed to find that theoretically I could upgrade the machine to 8Gb (if I could source the 2x4Gb DDR2 kit RAM – which is obsolete and very expensive, so I didn’t) but I could install a small SSD as well for about £20 …

This could turn out be a great little project to create an internet machine running a limited set of software like LibreOffice.
The Viglen Genie Tower was purchased in 2009, it has a 2.66GHz i7 Intel processor, 4Gb RAM and two HDDs – one 500Gb which has Win7 and XP installed on it; and the other a 1Tb removal HDD which will be the target for the Linux server installation. Configured this way I’d hoped to have a dual-boot into either a legacy Windows environment, or to the Linux server.
Why am I doing this? A good question. The answer … if I switched the machine on, it would work – I think it had Ubuntu 14.04 installed on it – but I’d forgotten the Linux admin passwords so couldn’t configure it – silly me!! So I think it’s about time I restored its capabilities as my back-up and development Linux server. Until I switched it on, I’d forgotten that it also had both Windows 7 and XP with software installed on it in a dual-boot configuration – so I was keen to keep that as well. It has Office 2007 installed on it – the last version of Office I could use easily and very similar to the Office 2011 I have on my iMac – still running MacOS 10.14 (Mojave) because of 32-bit compatibility issues. Having the Win installation means I can possibly upgrade the MacOS in the future – but I’m really not in a hurry to do that! [I do know about LibreOffice by the way!]
Why do I need a Linux server? Well, I could do more testing for the websites I run, I could also host websites on it – if I wanted to archive (retire) websites, and of course I could back-up my sites to it as well.
To create a server you need to install additional software to the Linux distro – I’ll be using Ubuntu – and you need to be mindful of the System Requirements. So you need to work backwards from what you want to do, to establish the minimum Ubuntu release you need to install. As essentially the machine was just going to serve files to another machine running browser software, and as there was only ever likely to be one user, the hardware requirements were going to be very low.
Ubuntu server itself has very frugal requirements, 500Mb RAM, 1GHz processor and 2.5Gb Hard Disk . It’s command-line driven, and has no Graphical User Interface (GUI). My problems with the current 14.04 installation came when I tried to create a dual-boot installation with a GUI and Server install and then forgot the passwords! So I couldn’t upgrade it, or do anything with it effectively!
The additional software I wanted to install was Samba – to allow me to transfer files from the other machines on the network to the Ubuntu server and LAMP, which stands for Linux, Apache, MySQL and PHP – all components needed to create a web-server. I will also be installing WordPress on it, which requires the LAMP components.
Building the Ubuntu 20.04 Server
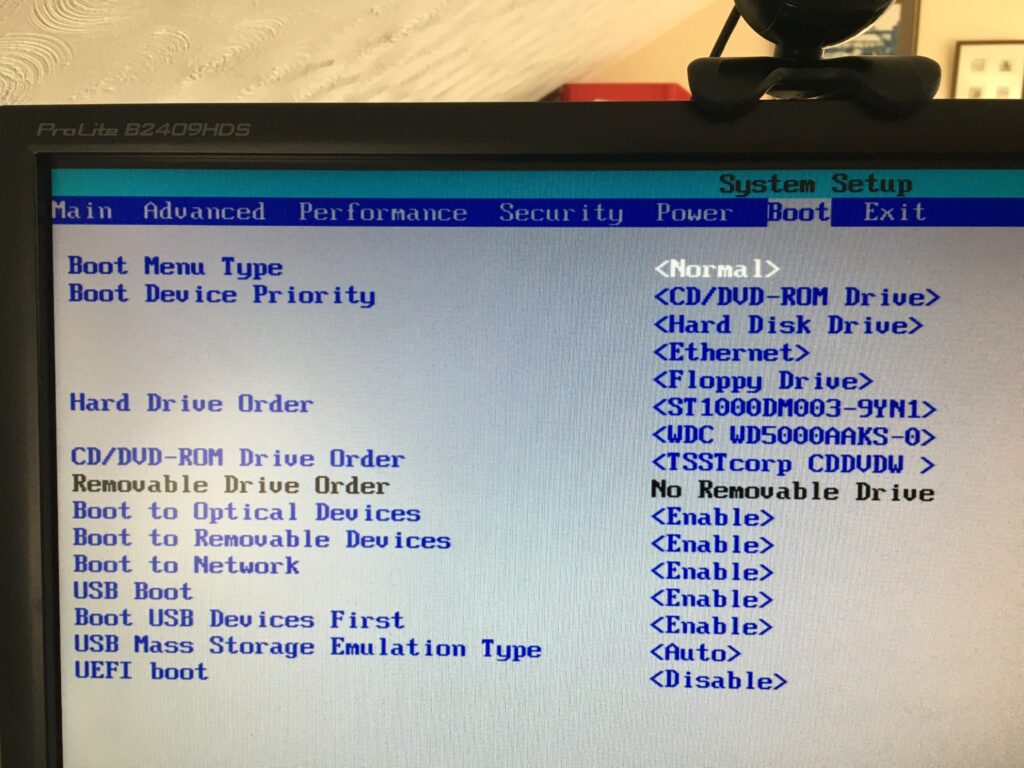
This was straightforward in one sense. I just booted from the USB LiveDisk I’d created on the iMac using balenaEtcher and chose the Install option which is described in this article. Once I’d done that I had some problems with the GRUB loader which seemed to have been damaged by the installation of the server software, but eventually I got round these using an old 14.04 LTS LiveCD disk to Boot into Rescue mode and from there followed the instructions from this article, a real life-saver. Before reading this I had been tearing my hair out and thought I’d completely trashed the machine. I’d not anticipated that the Windows partitions would still be there – but they were!
By doing the Grub Rescue this way I found I still had the legacy installations of Windows 7 and Windows XP on the machine. A real bonus because I could try and restore some of my Windows knowledge. It was surprising just how much I could remember, as opposed to Windows 10 which I just can’t get my head around.
Samba – the next step
And on to LAMP
And finally WordPress